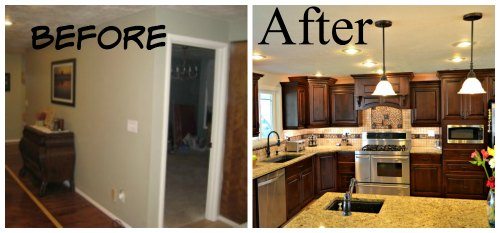
Before and After Kitchen Remodel
A few years ago we purchased a home built back in the early 1970’s. It had really not been remodeled that much since then. There were still only one light fixture, usually off in the corner, per each room. Many light switches still controlled floor electrical outlets, just as it was back in the 70’s were they used floor lamps then ceiling lights. The home we had just moved into had also been vacant for over 2 years.
It is amazing how much a home can deteriorate when not being used. The old iron pipes had corroded and the all needed replaced. We had a plumbing service like the ones at Sirius Plumbing and Air Conditioning services inspect our home and replace the old pipes. The ac system and the furnaces were on the way out and couldn’t keep the home even close to the same temperature. We are planning to seek help from HVAC services like Nance Services. The electrical system needed revamping and circuits split and more new circuits added to handle increase in lighting. The bathrooms needed upgraded from the peach and baby blue toilets and sinks.
The kitchen had a terracotta color tile and under the fridge there was an orange colored paisley carpet that was basically rotted through. Not only that but in a large home it had a small and narrow galley kitchen that you could touch the counters on either side with only barely reaching your arms out. And our home kept with the traditional style home of having a kitchen table area and a more formal dining room area. As a younger couple we were not interested at all in keeping a formal dining room. And we looked for ways to expand our kitchen, we looked up to companies like Granite transformations for recommendation. We both wanted an open floor plan for a kitchen remodeling which was done by some experts like Auckland kitchen renovations specialists and one big enough not to be crowded in the kitchen when we had family and guest over.
We began to remodel our home almost immediately after moving into our home. The kids helped my husband tear down the walls to the formal dining room. In the “before” picture you can see both walls that we tore down, on both sides of the door that you see to the right of the photo. Where the wall is on the far right side where you begin to see the dark cabinets on the edge of the photo is the same wall that in the “after” would of been along the edge of the granite that you see closest to you where the small sink is in the foreground. So essentially we expanded our kitchen over 5 feet wider and then behind the granite island you see in the foreground there we built two desk with granite counters and matching cabinets that go another 4 feet further into the old formal dining room. Both the desk area and the granite countertop island added a total of 10 feet or so width to the kitchen. Also by taking out the wall of where you see the photo on the wall to open up into a living room with couches really freed up lots of visual space to really make the room huge. This is a perfect kitchen remodeling for us!
Even though now it may look great the main part of the remodeling post here is that we paid it off in segments. We lived for 3 years with sheet rock walls in the kitchen with wires hanging out capped and taped off out of the walls for the soon to be cabinet lighting. And we had plywood for countertops, and had only wood cabinet boxes under them with no doors. We built our kitchen in stages. Doing it in stages enabled us to build it the way we dreamed we would want it. If we had tried to pay for it all at once there would of been no way we could of even afforded to build it the way it is now. It would of been way to expensive to do it all at once. Until my friend mentioned me about this site similar to goldhearthomes.com which provides experts who are equipped and capable of accomplishing every home remodel or renovation possible at a very fair and affordable rate.
Everything that we did we also did by hand. We put in the new tile floors with heating elements to warm it. After tearing out the old terracotta tiles and carpet under it and of coarse the rotten subfloor too. Paying off each job we did as we went allowed us the fun little extras like heated floors. And by saving tons of money by doing the work ourselves can save you sometimes more then half the cost of the job if you were to have someone else do it for you. Sometimes taking a week or two and watching online videos and reading how-to’s can save you thousands which enables you to spend a little more on fun additions to the remodel.
Just because you like to save money and live thrifty, doesn’t mean you have to buy poor quality and cheap materials. Living thrifty means that you find ways to save money and do things the smart way. Doing the tile floors yourself saves you lots of money, more then half because of how labor intensive it actually is. By saving thousands on tile floors gives you enough to spend a few hundred on heated floors that not only help heat your home more efficiently in the winter by radiating heat thus saving you money, but also feels great to the bare feet. That is being thrifty. We invested in hiring technicians to work on hot water tank repair for us to be ready for the winter, too. If you would want to you could even keep all of it and just do the floors with no heat and save that for another job in the remodel. But I have to tell, heated tile floors make the hard cold idea we all think of tile floors actually feel warm and cozy to the point you would rather stand on the heated tile then even a padded mat.
We recently finished remodeling our bathrooms as well. We ripped out all of the sheet rock, tile, tubs, sinks, toilets and everything else down to wood studs in each bathroom. Just like the kitchen we added heated elements for about $200 per bathroom which is the best money we have spent in both rooms! The heated floor is so nice to walk on in cold winter months when you wake to go to the bathroom in the middle of the night. Doing all of the work in the bathroom after watching sheet rock videos and watching how to texture videos on YouTube helped us to save enough money doing it our self that we were able to afford jacuzzi tub and granite countertops, tile surround showers and all new fixtures and sinks and toilets as well. Sure we could of avoided the tile shower surrounds and just installed pre-made plastic tub and shower inserts, but tile with glass accents add to selling value later if we were to sell the home.
Just because you save your money and do the work your self does not mean you can not save your money and buy upgrades to your home remodel. Take time to learn how to do it, and try sample areas to test how things work. Not only do you save money, and install upgrades to your remodel with fun accessories but you also get a high sense of accomplishment in knowing you did it your self.
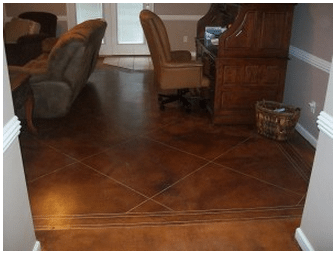
Not long ago we shared a post on DIY Concrete Stained Flooring . And a more in depth look into our kitchen remodel too.