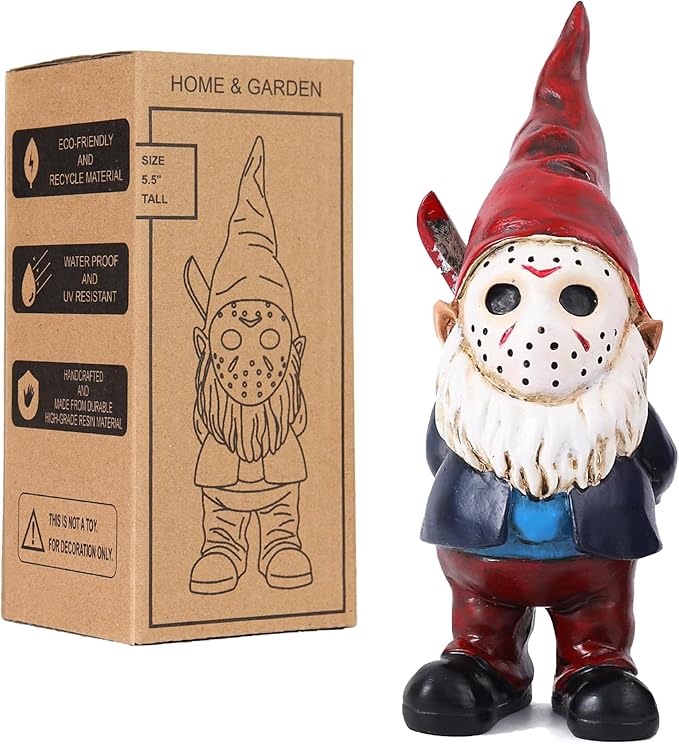
Halloween Tips


The nice folks at Pringles asked if I would like to try their new Snack Stacks, so you can only guess how excited the kids were to see a package of Pringles show up at our house.  Two big cans (for mom and dad) and a little Snack Stack  for each of my 4 kids. I told them they had to wait to eat them, but they could take them to school in their lunch box.  Knowing how much of a beating their lunch takes on their way to school I wondered if the chips would end up as a pile of crumbs… but they were happy to report they arrived save… and gobbles up in seconds by hungry tummies. 

  • Snack Stacks: Each single-serve tub is designed to conform to the Pringlesshape in Original, Cheddar Cheese and Sour Cream; available in 8, 12, 18, 32 & 36 count.
If you are looking for a spook but fun Halloween treat  idea you may wan to make these Pringles Ghoulish Brownies…super cute!

Pringles Ghoulish Brownies

INGREDIENTS:

  • 6 ounces baking chocolate, unsweetened
  • 3/4 cup unsalted butter or margarine
  • 2 cups sugar
  • 3 eggs
  • 1 tsp. vanilla
  • 3/4 cup flour
  • 1-6.41 ounce can of Pringles Original or 1-5.71 ounce can of Reduced Fat Pringles Original
  • 1 cup coarsely chopped pecans or walnuts (optional)
  • Orange and black frosting (optional)
  • Edible decorations, such as sprinkles and candy corn (optional)

DIRECTIONS:

1.       Preheat oven to 350 F

2.       Line 13×9-inch baking pan with foil, and spray foil with cooking spray.

3.       In a glass bowl, microwave chocolate and butter on high for 2 minutes.  Stir until chocolate melts.

4.       In a stainless steel bowl, mix sugar, eggs, and vanilla until well mixed.

5.       Pour in butter chocolate mixture and mix well.

6.       Empty Pringles and flour into a food processor, and puree until very fine.

7.       Empty flour mixture into chocolate mixture and mix well; add nuts to distribute.

8.       Bake for 30 minutes, and cool.

OPTIONAL DECORATION DIRECTIONS:

1.       Before pouring Pringles into food processer, reserve 3-5 crisps and set aside.

2.       While brownies cool, gently break Pringles crisps in half and decorate with frosting gel.

3.       Top brownies and frosting and place crisp “gravestones” in brownies along with other edible decorations to create a fun and playful graveyard scene.


I was not paid for this review,  and all opinions are my own.

Leave a Comment: 1 comment

Filed Under: Halloween Tips

Disclaimer: This post may or may not contain affiliate links.
SUBSCRIBE and never miss a thing!

Do you need a last minute yet “thrifty” Halloween costume for you and your hubby?

 Take a look at this super cute idea that Brittney sent me.  I have to give her hubby a huge thumbs up for being such a great sport!

 Way to go Brittney I love this idea!

This costume cost me zero dollars out of pocket.

  • I wore a black t-shirt I already had and he wore a white one he had. (I think we had to turn his inside out because he didn’t have any plain white)
  • I used clear trash bags (my old boss from high school owns a pizza place and I remembered them having big clear bags, so I offered to pay for 2 but they donated to my crazy cause!  )
  • I printed the S and P off big enough to cover an entire 8×10 page with my word program on my computer.
  • I found two matching sand buckets of the girls and covered them with aluminum foil.
  • (I also used some black paper and cut out small circles to put on top of the foiled buckets, but this is not necessary because we found most people don’t look at the top of your head. LOL)
  • We stuck our heads through the bottom of the bag and then our arms, and tied a knot in the bag as securely and close to our body as we could.
  • To make us look “full” I used crumpled up white paper in J’s bag and I used crumpled up black construction paper in mine. (we found the easiest way to do this was to put the bag on you first and stick it down the same hole you made for your head.

That’s it! We made these five minutes before we walked out the door for the church trunk or treat.

Leave a Comment: 1 comment

Filed Under: Halloween Tips

Disclaimer: This post may or may not contain affiliate links.
SUBSCRIBE and never miss a thing!

Looking for a fun Halloween treat?

Head over to Debz Days for a step by step video on how to make these cute little scarecrow cupcakes.

Leave a Comment: 2 comments

Filed Under: Halloween Tips

Disclaimer: This post may or may not contain affiliate links.
SUBSCRIBE and never miss a thing!

If you are still looking for a fun Halloween treat idea.  Then you may want to head to Disney Family.com, they  have  some fun recipes for Disney Halloween treats and spooky snacks including:

Leave a Comment: 2 comments

Filed Under: Free, Halloween Tips

Disclaimer: This post may or may not contain affiliate links.
SUBSCRIBE and never miss a thing!


This weekend I am having a little Halloween Party with my nieces and nephews so I have been on the look out for thrifty party ideas.  I thought this FREE DOWNLOAD  offered by Prepared Not Scared  was super cute.  You get to Pin The Teeth on Dracula game….. they are going to love it.

Thanks Moms By Heart and Prepared Not Scared

Leave a Comment: 2 comments

Filed Under: Halloween Tips

Disclaimer: This post may or may not contain affiliate links.
SUBSCRIBE and never miss a thing!

Need a quick and easy Halloween treat idea?  Check out these Spooky Eyeball Treats made with Hostess powdered Donettes.  My kids would love these.

Spooky Eyes

What you need:

  • Red frosting gel
  • Green frosting gel
  • 6 powdered sugar Hostess Donettes
  • 3 red ring-shaped hard candies
  • 3 green ring-shaped hard candies
  • 6 semi-sweet chocolate chips

Use red frosting gel to draw 4 or 5 lines from center of Donette to outer edges to resemble bloodshot eye. Position ring-shaped hard candy over the hole in the center of the Donette, using frosting gel in coordinating color as glue. Place a chocolate chip on top of candy to resemble eye, again using frosting gel as glue.

Makes 6 servings.

Thanks Hostess for this idea

Leave a Comment: 1 comment

Filed Under: Halloween Tips

Disclaimer: This post may or may not contain affiliate links.
SUBSCRIBE and never miss a thing!

I got an unexpected package in the mail…. opened it up and found these fun little goodies.

So I did what any normally person would do… put them on (in my PJ’S no less) and ran in at lightning speed and jumped on the couch in front of my very confused husband.  He just gave me that look … What on earth are you doing.  Come on, it was a fun way to start the day… I think I should do it more often.

Well the package came from Savers, and they wanted me to pass along a little information about Halloween.  And let you all know that they have  a large selection of new and used costumes at affordable prices.

Here are some other interesting findings from Savers Halloween Shopping Survey:

  •   Décor is almost as important as costumes – More than half of consumers plan to decorate their homes for Halloween, and 43 percent plan to decorate both indoors and outdoors. Savers offers tons of DIY ideas online and in their stores that provides you with supplies needed and directions on how to make the perfect home décor and costumes yourself this Halloween!
  • Dog costumes are growing in popularity – pet owners expect to spend $59 on average to costume their four-legged family member.This is more than they expect to spend on themselves or their kids’ costumes!
  • People plan ahead for Halloween – Most people spend 61 days planning and preparing their costume. This isn’t surprising as more and more people (54 percent) are combining new and used items or making their costume by hand to put together a unique and economical look. Savers has special costume consultants in each and every Savers and/or Value Village store. They’d be happy to chat with you!
  • Despite the economy, people want a new Halloween look – 90 percent of adults and 93 percent of kids that dress up say they sport a fresh look each Halloween versus wearing the same costume as a previous Halloween. Many times people use elements from a previous costume and add new pieces or accessories for a whole new look, rather than going as the exact same character multiple years.

Have no fear…. A Thrifty Mom and her coupon binder are near!

Oh ya and if you missed what they sent me last year then watch the video below….. still makes me laugh.

Or you can click here to watch it

Leave a Comment: 2 comments

Filed Under: Halloween Tips

Disclaimer: This post may or may not contain affiliate links.
SUBSCRIBE and never miss a thing!

Last year I posted this video on HOW TO make your own TuTu and Pom-Poms for Halloween.  If any of you are looking for a thrifty Halloween costume you may want to check it out.  If you can’t see the video Click Here to watch it.

Leave a Comment: 8 comments

Filed Under: Halloween Tips

Disclaimer: This post may or may not contain affiliate links.
SUBSCRIBE and never miss a thing!
transformer costume

Transformer costume

Ironman costume

Ironman costume

Cinderella costume

Cinderella costume

Halloween is right around the corner. Have you thought about what the kids are going to be wearing? Or how about yourself? Going to a party? Don’t show up in a sheet with holes…Halloween Costumes: Up to 75% off!

Leave a Comment: 1 comment

Filed Under: Halloween Tips, Online deals

Disclaimer: This post may or may not contain affiliate links.
SUBSCRIBE and never miss a thing!

First I just wanted to say a HUGE  THANK YOU to everyone who took the time to submit your Thrifty Halloween tips.  We really enjoyed hearing from our readers and wish we could give you ALL a $25 gift card…..  But since I am A Thrifty Mom, not  Oprah that is not going to happen. We each picked our favorite tip and asked a few friends to also select their favorite.  We came up with our TOP 5, You will now get to pick the winner ( the person with the most votes will win a $25 visa gift card).  One vote per person, simply leave a comment letting us know which one is your favorite!

Tip #1

Thanks to Streatching your Dollar$ Idaho for todays thrifty tip,

milkghostMilk Jug Ghost Lights (A few years ago we made Milk Jug Ghost Lights. Here is how we did it…) attached is a pic. of when we did our Jug Lights a few years ago

-First you want to save 5-10 milk jugs (however many you will use) rinse them out and dry them
-Once they are dry use black permanent marker to make scary faces on the front
-Cut a small hole in the back of the milk jug
-Lay them outside or in your windows and put a string of Christmas lights in the holes you cut in the back of the jugs and you have cute Ghost Milk Jug Lights
(Total cost will be FREE if you save your milk jugs and use a strand of lights you have at home, if not you can pick up a strand at the dollar store)

Tip #2

Thanks to Kimberly D for todays tip

So my husband came up with this really thrifty, really cool Halloween decoration. He bought an orange table cloth and some black poster board, the table cloth was $1.50 at Wal-mart and we already had the poster board. We cut the eyes, mouth and nose out of the poster board and taped it to the window like a jack-o-lantern face and then hung up the orange behind it, so when our lights are on we have a huge glow in the dark pumpkin in our window.droid pics 053

Tip #3

Todays Thrifty tip is from Andrea,

wartwitch

One year for a Halloween party, a favorite game we made and played was “Pin the wart on the witch.” All you need is a poster board (if you took advantage of the cheap poster boards on sale at WalGreens over the summer <.29 cents>, you should have a few), some paint or crayons or markers, tape, and a creative hand. Here is our pin the wart on the witch board game. You can see how the kids did with their wart pinning. Thrifty and fun.

Tip #4

Thanks to Kristy L. for this thrifty tip,

all 024Here is a costume that I made for my son. It was totally free! (I had everything you see laying around my house and garage!) It was super easy to make too! I used a box and threw a plastic table cloth over it. I used cardboard from another box to make the top pillars and attached cardboard to the top for the “sign”. I just used a belt to secure it onto his waist. I dressed him up in his Sunday clothes and I taped a plastic cup for all the money that he would make! It was the HIT of the community party! He actually made like $15! It made enough money for all of us to eat and for him to play a bunch of games! Super thrifty if you ask me! You could also do a lemonade stand, cookie stand, dj booth…Use your imagination! SOOOO easy and SOOOO cheap! Happy Halloween!

Tip #5

Thanks to Michelle for todays Halloween tip, ( these are so darn cute)

I wanted to share with you a homemade halloween costume I did for my twins last year, This is very thrifty to make I spent a total of less the $5 for both costumes, I attached a pc for you and here are the deatils of how to make it and I hope you and your readers enjoy this. They were a huge hit last year. My twins Emylee and Shaylee were a BUNCH OF GRAPES
grapes

I made the purple grapes so I started off with purple shirts and black leggings.

I bought a large bag of purple balloons at the party store, a box of safety pins, and some green felt .

First you must blow up all the balloons, make sure they are different sizes. After all balloons are blown up this is where your crafty skills need to come in.
You will need to attach the safety pins to the balloons tie, be careful not to puncture the balloon.
Start at the top of the shirt collar, and in a upside down rainbow motion start to pin them to the shirt. My kids were small so the top layer was 6 balloons the second layer 5, 3rd layer 4, 2nd layer 3, then 2 then 1.
Green felt to make the stem and leaf, cut out a large leaf to attach to the middle of bunch of grapes.I then cut a a small circle and attached to their heads with bobby pins, and your done , you will have a great bunch of grapes!

Leave a Comment: 84 comments

Filed Under: Halloween Tips

Disclaimer: This post may or may not contain affiliate links.
SUBSCRIBE and never miss a thing!