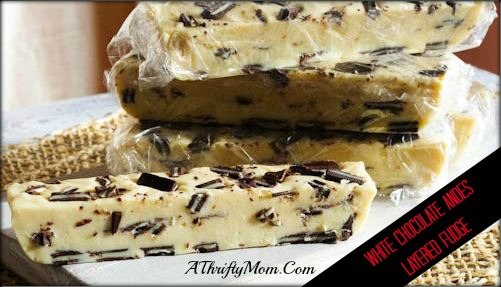
Money Saving Recipes

Last updated by at .

Monte Cristo Waffle Sandwich, Lunch Recipe, Eggo Week Of Waffles,Eggo Chief Waffle Officer, Great Eggo Waffle Off, Recipes Using Eggo Waffles, Money Saving Recipes

Monte Cristo Waffle Sandwich by Tiffany

It has been a while since I’ve made a Monte Cristo for myself, but I knew I had to make one using waffles for this weeks Eggo Week Of Waffles.  I don’t eat a lot of  sandwich meat, so I got one of my willing taste tester friends to help taste test this recipe. “Come here lil’ guinea guinea guinea. I needs me some help using your taste buds.” ;)  He was very much obliged to help- being that he got this tasty Monte Cristco Waffle Sandwich.

Monte Cristo Waffle Sandwich, Lunch Recipe, Eggo Week Of Waffles,Eggo Chief Waffle Officer, Great Eggo Waffle Off, Recipes Usin

Yields 1 sandwich

Ingredients

  • 3 Eggo Waffles - Homestyle
  • 4 slices oven roasted turkey
  • 4 slices honey ham
  • 2 slices Swiss cheese
  • mayonnaise
  • Dijon or honey mustard
  • 1 egg
  • 1/4 cup milk
  • pinch of salt
  • 1 tablespoon salted butter
  • 2 tablespoons oil
  • raspberry or blackberry jam, optional

Directions

  1. Bring Eggo waffles to room temp. We’re going to make a triple decker out of this baby.
  2. Lightly spread mayonnaise and mustard onto waffle. Next, layer 1 slice of cheese, 2 slices turkey and 2 slices ham on waffle. Top with another waffle, again lightly spreading mayonnaise and mustard. Layer middle waffle with 1 slice of cheese, 2 slices turkey and 2 slices ham. Top with remaining waffle to make a triple decker.
  3. In a medium bowl, whisk egg, milk and salt.
  4. In a medium skillet, heat butter and oil over medium heat.
  5. Dip entire waffle sandwich in egg mixture.
  6. Fry, until lightly golden brown on each side. Approx. 6 minutes total. Serve with raspberry or blackberry jam, optional.

Leave a Comment: 1 comment

Filed Under: Recipes

Tags: , , , , , ,

Disclaimer: This post may or may not contain affiliate links.
SUBSCRIBE and never miss a thing!

Cowboy Casserole, Money Saving Recipes, Ground Beef Recipes, Casserole Recipes

Want to feed your gang, but don’t want to spend a lot of $$$$ doing so?! Well then, you’ve come to the right place! Today’s recipe is featuring ground beef. Ground beef, my go to meat when the budget is a little tight. :) This recipe is packed with, as I would call, “healthy fillers” including beans, corn and tomatoes to make the ground beef stretch farther. I have my little tricks, as I’m sure you do too, when it comes to feeding your family and making your dollar stretch farther for your gang.  If you have a “stretch your ground beef farther method”, please share it with the rest of us. We’d love to hear it!

Ingredients

  • 1 3.4 lbs. ground beef
  • 2 celery stalks, diced
  • 5 garlic cloves , minced
  • 1/2 cup chopped sweet onion
  • 1 can (14.5 oz.) diced tomatoes
  • 1 can (15 oz.) black beans, drained
  • 2 cups frozen super sweet white corn
  • 1 can tomato sauce
  • 3 tablespoons McCormick taco seasoning
  • approx. 1/2 cup shredded pepper jack cheese
  • approx. 1/2 vintage white cheddar

Crust

  • 1 1/2 cups unbleached all-purpose flour
  • 1 teaspoon McCormick taco seasoning
  • 1 teaspoon baking powder
  • 1/2 cup unsalted butter, melted
  •  1 cup half and half

Directions

  1. Preheat oven to 350 degrees F.
  2. In a large skillet combine ground beef, celery and onions. Brown over medium high heat; drain fat.
  3. Add diced tomatoes, black beans, corn, tomato sauce and taco seasoning; stir.
  4. Scoop mixture into a large 3 quart baking dish. Top with cheeses. Set aside.
  5. Let’s make the crust – In a medium mixing bowl, combine flour, taco seasoning, baking powder, melted butter and half and half; whisk until smooth. Pour crust mixture evenly over meat mixture. Bake in preheated 350 degree F. oven for 35-40 minutes Or until crust is lightly brown. Serve.

Leave a Comment: 5 comments

Filed Under: Recipes

Tags: , , , ,

Disclaimer: This post may or may not contain affiliate links.
SUBSCRIBE and never miss a thing!

Coconut Quinoa with Spicy Vegetables, Money Saving Recipes, Recipes Using Quinoa, Vegetarian Recipes, Quick Dinner Recipes, 30 minute or less dinner recipes

Coconut Quinoa with Spicy Vegetables by Tiffany

My husband is a very strict vegetarian. He’s not mostly a vegetarian or even partly vegetarian, he’s a full on vegetarian- he’s almost a vegan.  It’s a diet conviction he has chosen for himself after battling cancer, twice. It’s fun coming up with new recipes for him, especially recipes that can be whipped up in a flash. Recently, we had a coconut cilantro flavored rice while dinning out. It was so stinkin’ tasty. I knew I wanted to incorporate that flavor with Quinoa. I came home and started experimenting. Coconut Quinoa with Spicy Vegetables was born. Enjoy, my spicy vegetarian friends!

Ingredients

  • 1 cup quinoa
  • 1 cup unsweetened coconut milk
  • 1 cup water
  • 1 heaping  tablespoon chopped fresh cilantro
  • 1 1/2 -2 teaspoon grape seed oil
  • 1/2 cup diced zucchini
  • 1/2 cup diced squash
  • 1 cup sliced portabella mushrooms
  • 1/2 cup diced orange bell pepper
  • 1/2 cup diced red bell pepper
  • 1 cup broccoli slaw
  • 1 can (14.5 oz.) diced tomatoes
  • approx. 1 teaspoon kosher salt
  • 1 teaspoon granulated California garlic
  • 1/4 teaspoon ground cayanne pepper

Directions

  1.  Rinse 1 cup quinoa under cold water. In a medium saucepan, combine quinoa, coconut milk, water and cilantro. Bring to a boil over high heat. Reduce heat to medium, cover with lid and simmer for 15 minutes or until quinoa is tender.
  2. In a large non stick skillet, heat grape seed oil over medium heat. Add zuchini, squash, mushrooms, peppers and broccoli slaw; tossing frequently. Cook until zuchini is fork tender. Approx. 8 minutes.
  3. Now add diced tomatoes, salt, garlic and cayenne; toss just until tomatoes are heated through. Serve over quinoa.

Leave a Comment: 0 comments

Filed Under: Light Recipes, Recipes

Tags: , , , , ,

Disclaimer: This post may or may not contain affiliate links.
SUBSCRIBE and never miss a thing!

Vegetarian Enchiladas, Freezer Meals, Money Saving Recipes, Freezer Recipes

Vegetarian Enchiladas by Tiffany

Being that I run a household with many different diet requirements, I thought I’d share one of our absolute favorite vegetarian meals – for my vegetarian friends. This recipe is hearty, simple and very satisfying. The carnivores in the house don’t even miss the meat – now that’s saying something!

*Notes* This is a great freezer meal. Make one for now, freeze one for later. To bake frozen enchiladas, remove from freezer, bring enchiladas slightly to room temp. Remove lid, cover with aluminum foil. If covered with plastic wrap and foil, remove plastic wrap, bake as directed. Add additional time to make sure the enchiladas are baked all the way through. Approx. 1 hr.

Ingredients

  • approx. 2-3 tablespoons olive oil
  • 10 garlic cloves, minced
  • 2 zucchini, chopped
  • 2 small yellow squash, chopped
  • 1 small sweet onion, diced
  • approx. 1/2 cup shiitake mushrooms, diced
  • 1 red bell pepper, diced
  • 2 cups broccoli slaw
  • handful of fresh chopped cilantro, chopped
  • 1 can (14 oz.) quartered artichoke hearts, drained
  • 16 flour tortillas
  • medium vintage white cheddar cheese, shredded – desired amount
  • fresh mozzarella, shredded – desired amount
  • 1 can (28 oz.) enchilada sauce ( I use El Pato)
  • 1 can (2.25 oz.) sliced olives

Directions

  1. In a large non stick skillet heat olive oil over medium heat. Add garlic, zucchini, squash, onion, mushroom, red pepper and broccoli slaw. Cook, tossing frequently, until zucchini and squash are slightly fork tender. Reduce heat to low, add drained artichokes and fresh cilantro; toss. Remove from heat. Set aside
  2. Warm tortillas. Keep tortillas warm in a tortilla warmer. This will keep them pliable and easy to fold when making the enchiladas.
  3. Pour approx. 1 1/2 cups of enchilada sauce into a round baking dish.
  4. Dip tortillas in enchilada sauce, fill with approx. 1/4 cup vegetable filling, top vegetables with desired amount of both cheeses; fold. Place enchiladas in TWO 3 qt. baking dishes for a total of eight each, in each dish. Top enchiladas with additional enchilada sauce, vintage white cheddar, mozzarella, remainder vegetables, olives and cilantro if desired. At this point they can be frozen. Cover with lids and freeze. If you do not have lids, cover each baking dish with a layer of plastic wrap and a layer of foil, freeze.  See notes for baking instructions if freezing.
  5. Bake in a preheated 350 degree F. oven for 40 minutes. Serve.


Leave a Comment: 0 comments

Filed Under: Recipes

Tags: , , ,

Disclaimer: This post may or may not contain affiliate links.
SUBSCRIBE and never miss a thing!

Mixed Berry Crumble, Desserts For One Recipes, Recipes For One, Dessert Recipes For One, Money Saving Recipes, Microwave Dessert Recipes For One

Mixed Berry Crumble ~ Dessert For One by Tiffany

There are times in our life when we need dessert for one. Usually, and I’m being totally transparent here, I grab a bag of milk chocolate chips, run up to my closet and lock the door behind me. ;) I’m very careful not to make the bag crinkle too, or I’ll five lil’ monkeys banging on my door asking me, “Whatcha eating?! Whatever it is, CAN WE HAVE SOME?!!!” What can I say, other than I may have a tad bit of an addiction to good chocolate. Hey, dessert and a moment alone = PARADISE! lol Well, this recipe isn’t chocolate, but it sure is tasty if I may say so myself. Scoop some nilla ice cream on top and you have yourself a little ramekin of berry crumble heaven.

*NOTES*

I tested this recipe in the microwave for those of you who use it. I don’t use the microwave to cook or bake in, so this was a total NEW experiment for me. All in the name of foodie science! ;) Follow the directions below, instead of baking in the oven, put in the microwave for 4-5 minutes.  Check it after 4 minutes. Use your judgment if you think it needs an additional minute.

I don’t recommend this method using a small ramekin as the directions state below for the oven. Here’s why, I learned the hard way… It looked like a berry blob exploded in the ramakin, most of the crumble sunk to the bottom and a lot of the juices ran over the cup too. I do however recomend using a slightly larger microwave safe bowl instead of a small ramekin, if using the microwave method, so the juices don’t over flow. Add an additional 1/4 cup of berries for the microwave method. (No need to worry about adjusting the other ingredients.) Plop a scoop of ice cream on top and call it a night. ;)

Ingredients

  • 1/2 cup mixed frozen berries
  • 2 teaspoon sugar
  • 1 teaspoon cornstarch
  • 1 tablespoon salted butter, room temp.
  • 2 tablespoons all-purpose flour
  • 1 tablespoon brown sugar
  • 1/2 teaspoon ground cinnamon

Directions

  1. Preheat oven to 400 degrees F.
  2. In a small bowl toss frozen berries and cornstarch together. Place berries into a ramekin.
  3. In the same small bowl, combine butter, flour, brown sugar and cinnamon with a fork until you get pea sized crumbs.
  4. Pack crumble on top of frozen berries. Place ramekin on a piece of heavy duty foil and bake in your preheated 400 degree F. oven for 20 minutes. Serve with a scoop of vanilla ice cream.


Leave a Comment: 2 comments

Filed Under: Dessert, Recipes

Tags: , , ,

Disclaimer: This post may or may not contain affiliate links.
SUBSCRIBE and never miss a thing!

I am excited to let you know that this week we will be working with Eggo.  We have been selected as a Chief Waffle Officer and get to share 7 amazing recipes with you, all featuring Eggo’s.  Everything from breakfast, lunch, dinner and a snack!  I hope these recipes give you some creative ideas, because you can make your own and enter them in the Great Eggo Waffle Off for a chance to win $5000!

Day 1 ~ Eggo Breakfast Kebabs

Day 2 ~ Smore Waffles Please, Snack Recipe

Day 3 ~ No Bake Strawberry Cheesecake Waffle Bars

Day 4 ~ Chicken Pot Pie Waffle Boats

Day 5BLTA Waffle Sandwich

Day 6Baked Caramel Apple Waffles with Crumb Topping

Black Forest Waffle Ice Cream Cake, Breyers Ice Cream Recipe,Eggo Week Of Waffles, Money Saving Recipes, Recipes Using Eggo Waffles, Ice Cream Cake Recipes

Black Forest Waffle Ice Cream Cake by Tiffany

Eggo, wanted a recipe using Breyers ice cream for Eggo Week Of Waffles. My mom and I racked our brains for this one. I call her when my brains are fried and I need help with ideas. ;)

My mom, is my long distance sou chef. We joke all the time about this. She’s in Oregon and I’m here in Idaho. We talk EVERYDAY bouncing ideas off each other when it comes to recipes. And of course, we shoot the breeze a lil’ too.

So, being that my mom is a professional cake decorator,  I called her. She had some elaborate idea for a towering ice cream waffle cake. Um, but, being that I am NO cake decorator, and most likely if I tried making a towering waffle cake, you’d see the end result all over the floor with the dog licking it up. Yeah, cake decorating is not my thing. I’ll leave it to the pros. What tickles me the most, she had it all planned out in her brain how it should look with instructions to boot.  My brain was miles behind hers screaming, “WAIT! Hold the phone, sister!” So after talking for about a hour to my dear madre, I came up with this.

Black Forest Waffle Ice Cream Cake, Breyers Ice Cream Recipe,Eggo Week Of Waffles, Money Saving Recipes, Recipes Using Eggo Waffles, Ice Cream Cake Recipes,1


Ingredients

  • 12 Eggo waffles -homestyle
  • 1 jar (16 oz.) hot fudge topping, homemade or store bought
  • 1.5 quart Breyers chocolate ice cream
  • 16 oz. chocolate whipped topping
  • 1 can (21 oz.) cherry pie filling & topping
  • chocolate shavings for garnish, optional

Directions

  1. Bring waffles to room temp.
  2. Soften ice cream by removing from the freezer to thaw. You will want your ice cream almost melted, so that it’s easy to spread.
  3. Spread each waffle with fudge topping. Lay each waffle side by side in two rows in a 3 qt. baking dish. (Each row will have three, for a total of six.)
  4. Next, spread half the container of ice cream all over the fudge covered waffles. Spread the fudge topped waffles with half the whipped topping. Top whipped topping with half the pie filling. Evenly dredge the filling with a knife. Repeat layers, ending with pie filling on top.
  5. Now, gently dredge a knife through the pie filling and whipped topping to make it look pretty. Use the remainder whipped topping to star the sides for a finished look. Gently cover and freeze over night. To serve, remove from freezer and let set at room temp for approx. 8-10 minutes before slicing; serve.

*Notes* The chocolate whipped topping I used comes in a bag, frozen all ready to go with star tip. You can find this at Cash & Carry in the freezer section. Bring it home, thaw it in the fridge and your set.

Disclaimer Eggo supplied the tools needed to create the recipes show above and a stipend.

Leave a Comment: 0 comments

Filed Under: Dessert, Recipes

Tags: , , , , ,

Disclaimer: This post may or may not contain affiliate links.
SUBSCRIBE and never miss a thing!