
DIY Personalized Board Book ~ By Tami
I seem to have an over abundance of books. All kinds of books, but especially children’s books. I love them, and started buying them for my babies when they were very young. Now, they are too old for many of them. As I was picking up several board books that had been thrown off the book shelf, I thought of this idea. Why not turn them into something that the older kids would still love and use? Sure, I could donate them, but many of these board books aren’t in the best condition. They have been well loved, and could use a makeover!
What you will need:
Board book
Scrapbook paper to fit your pages
Scissors or paper trimmer
Mod Podge (great price on Amazon! click for the link)
Old Gift Card, Credit Card or something flat to rub paper down
Sponge paint brush (great price on Amazon! click for the link)
Photos, memorabilia to add to the pages
I have been trying to come up with a way for my children to learn some verses that are important to my family. I thought this was the perfect project for that. All I did was print out my verses on my scrapbook paper. No need for a special printer, the ink will be protected by the Mod Podge.
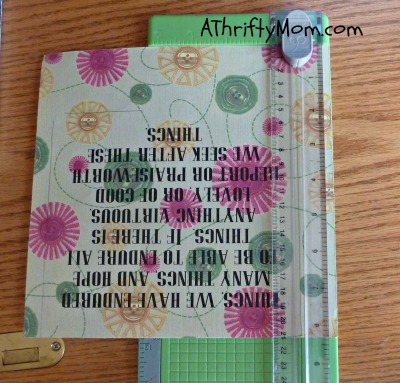
Begin by measuring your book and cutting your scrapbook paper to fit. My book had rounded corners, so I also took care of that so it would match.
Time to apply the Mod Podge. If you haven’t used Mod Podge before, it is super easy. I was terrified I would mess it up the first time I used it, but now it is one of my favorite craft tools. I meant to get a picture of my bottle. I prefer to use the Matte finish (it is in a yellow bottle) for many reasons; it doesn’t smell (the gloss version does), once it dries you can’t see it brush marks or imperfections like you can with the gloss, and it is much more forgiving if you mess up. A bottle of Mod Podge lasts a long time, apply it sparingly.
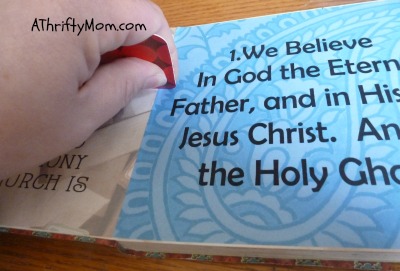
Using a foam, craft paint brush, apply thin strokes directly to the pages of your book one page at a time. You want to make sure to cover the entire page, but not with a very thick layer.

Once your page is covered in Mod Podge, apply your paper/picture of choice. You could make a great little album by adding paper and then applying pictures and embellishments on top. Apply each item using Mod Podge as glue, but don’t seal the page until the whole page is on. Make sense? In other words, you don’t have to seal after each photo/embellishment goes on, just when the page is complete. It is perfectly fine to apply Mod Podge on top of photographs. I have don’t it multiple times.
Now, take your credit card or flat object and gently yet firmly rub along the paper. Begin at the middle and work your way out each direction. This will remove the air bubbles and push them out the sides. You can continue to do this until there are no bubbles or bumps in your paper.
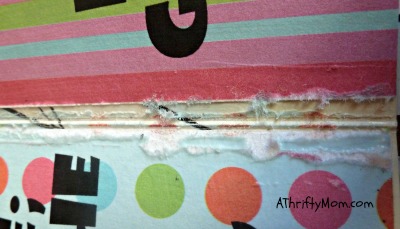
Once the page is smooth, apply more Mod Podge on top of it. Again, use thin layers. If a page begins to bubble up, you can take your flat surface (or a finger) and flatten it out. If you wipe off Mod Podge doing so, just reapply to cover. Mod Podge not only acts as an adhesive, but it also protects and seals your page. Make sure you lay the book open for a while and let the page dry. I would suggest a few hours just to make sure there isn’t hidden, wet Mod Podge somewhere under the paper that would cause your page to do this:
This project will require patience. You won’t be able to finish the whole thing in an hour.
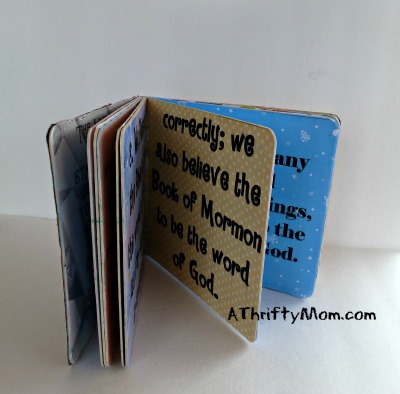
Once you are finished applying each page , letting it dry, and getting it just the way you want it, find something heavy. The pages will warp slightly and not want to sit together perfectly flat as they did before you added to it. I put my sewing machine on top of it for a while and then it closed fine. It is still a little stiff, but will loosen up as time goes on. I am thinking this would be a perfect gift for a grandparent or relative who lives away. You add the pictures and you have a one of a kind gift for someone you care about. It could also work to add pictures of baby and then they have a book all about them, that they can’t destroy! So many gift ideas. Get started now and get your Christmas crafting done early!
Looking for More Online Deals? Click here for more THRIFTY DEALS. Please note that Amazon prices tend to change often so prices may be higher or lower without notice.