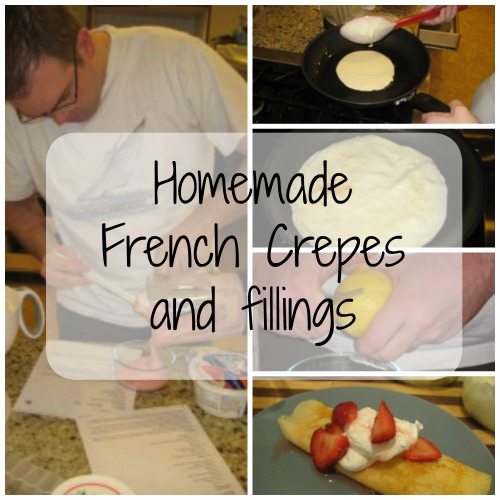
A Thrifty Dad

Don’t miss out on these three HOT Jamba Juice coupons that just came out at midnight! 

Personally I have had each of these and love each so much. Stay fit and healthy with these awesome choice’s and get your 3 full servings of fruit and veggies!

This is an image that can be reprinted. It is direct from the manufacture, and was given to me (Matt) to share as a National Ambassador of WOW.

Feel free to print away - and share with your friends!

Leave a Comment: 2 comments

Filed Under: Jamba Juice, Printable Coupons

Tags:

Disclaimer: This post may or may not contain affiliate links.
SUBSCRIBE and never miss a thing!

With two little girls in the house we have hair clips, flowers, head bands and ribbons all over the house.  We have a drawer from them in the bathroom, but they are a jumbled mess.   So making a hair  accessories board has been on my to-do list for some time now.

My friend DeAnna gave me this magnet board about 5 years ago from Christmas.  She made it, so I loved it…but once we moved to our new house I never found a place to hang it.  So it never got put back up and sat in my closet.  The other day I had an idea… I thought hmmm that would look cute in  the girls bathroom.  I took the back off and tied ribbon around the middle, and tied it in a knot.

I then put the metal sheet back into place, I added a few nails to make sure it would not pop out.

You could make this same board by using an frame

Since it is a magnet board I added a few magnets to items like a brush and a jar of pony tail holders.  I just used a super glue dot to hold it in place.

Then it was time for the girls to add their clips, head bands and ribbons.

I left one of the ribbons rather loose and then used glue dots to create segments to hang their hand bands on.

The girls love it and I have fun making a “girl project” with my little cuties.

I love it when I can re-purpose something and save money!

Leave a Comment: 6 comments

Filed Under: DIY, Look What I Made

Disclaimer: This post may or may not contain affiliate links.
SUBSCRIBE and never miss a thing!

No more paper bill clutter

02/27/2012 2:55 pm · 1 comment

What is Manilla? Manilla is a free web based service that helps consumers better manage all of their household accounts, including financial, utilities, subscriptions and travel rewards programs, in one secure place online. Under a single password, Manilla provides customers with an automated, organized view of all of their account information, text and/or email reminders to pay bills and unlimited storage of account documents that Manilla has seamlessly retrieved for the consumer.

Why is Manilla necessary? Most people have more than 20 different household accounts, including three to four credit cards, several travel and hotel rewards accounts, multiple magazine and newspaper subscriptions, plus cable, phone, and other assorted utility bills. In order to stay on top of all this, people have to manage daily incoming paper mail, an array of online usernames and passwords, and websites in order to access important account information and take action. Manilla seamlessly retrieves all your account information – current balances, previous payments, upcoming bills due – and stores it for you in one secure place. Most importantly, you need only one password to view, manage and organize it all.

Check out Manilla for free

This is a sponsored conversation written by me on behalf of Manilla

Leave a Comment: 1 comment

Filed Under: Debt Free Zone, Free

Tags: ,

Disclaimer: This post may or may not contain affiliate links.
SUBSCRIBE and never miss a thing!

food_and_water

It dawned on me a few weeks ago, after getting comments about what we bought for our weeks purchases, that many people do not shop like us. One comment questioned what we actually cooked for our children. The week totals for our food shopping consisted of paper plates, bag of chicken, twizzlers, and a few other odds and ends like pickles and such. Poor Sarah became disheartened when she was told she didn’t feed her children proper food. And now looking back on our shopping trips on a per week basis, I can understand where the misconception about what we buy verses what we feed our children comes from. It is how we actually shop and use our food storage, not on a per week or even per month, it is based on a per year scenario. See many people we know shop for their groceries on either a per week basis, and some even shop daily for what they eat that day!

That’s fine if that is working for you. But in today’s economy and social habits, many people do not plan ahead. How many stock brokers do you know who actually buy and sell based on what the company is doing in the years to come, not many. Most decisions today are spur of the moment. We see a TV we like we buy it, based on want verses need. The economic trouble we are in nation wide is rooted in that very theory. We want it we get it, not thinking of if we can afford it, and not only that but can we afford it if something were to happen. The housing market crashed because a handful of problems came up and the credit we put out fell due to not being able to afford what we wanted verses what we actually could of got by with. If everyone would of saved, waited for the right time, not based on our wants but waited for the right time to get a good deal then we would not be where we are nationally today.

So how does this tie in with couponing you ask? Well we buy our food (about 95%) based on what we need for the year. Now we do not yet have a solid year supply of food, but we could live and survive on it for close to that. We still need to diversify our storage. More rice and flour, and a larger water supply. So those weekly updates on what we bought that week are only what we add to our existing food storage system. It is not what we plan on eating that week or even in most cases what we are going to consume that month even. When we first started this blog well over a year ago, there was a sale on soda, we still have much of that soda around. Last spring there was a sale on cereal, we just barely ran out of that cereal from back then, and not long ago there was another sale on cereal that we restocked with. Last week we bought a large 25 pound bag of sugar that we restocked our current containers of sugar with. That same week we bought 5 bags of graded cheese that we put in the freezer to use in future dishes. Most likely it will take 2-3 months to use up that cheese.

We plan ahead. We don’t need storage buckets right now, but when we were in Tillamook Oregon at the cheese factory we bought some. They have these cute little 3 gallon buckets with lids for only 50 cents each. We bought 10. They are a lot easier to handle, and fit in shelf’s much better then the large 5 gallon buckets

059

Now as a deal comes along on rice, sugar, salt, oatmeal, or what ever else we can save on we will put in these buckets. This way if we can not make it to the store due to an illness or even financially we will have food stored for a day that we need it.

Leave a Comment: 28 comments

Filed Under: A Thrifty Dad, Coupons

Tags: ,

Disclaimer: This post may or may not contain affiliate links.
SUBSCRIBE and never miss a thing!

How to stay out of debt

02/25/2012 1:00 pm · 1 comment

I couldn’t of said it better my self. Every so often we have posted about our own debt, and how we got out of it 100%. We try and share ideas and tips to living debt free. But this Steve Martin SNL skit says it best!

Leave a Comment: 1 comment

Filed Under: Debt Free Zone

Tags: , ,

Disclaimer: This post may or may not contain affiliate links.
SUBSCRIBE and never miss a thing!

How to Freeze Eggs

02/25/2012 6:00 am · 6 comments

Photo Credit 

Did you know that you can  freeze eggs?

Break each egg into an ice cube tray, 1 egg per cube. Mix the yolk & the white together slightly (to prevent texture inconsistencies after thawing). Freeze the eggs and transfer to a ziptop bag and label with the date. Eggs can be stored, frozen for up to a year. Just thaw in the refrigerator over night before use.

This is a great tip for when eggs go SUPER CHEAP around Easter each year!

Thanks Realistic Couponers 

Leave a Comment: 6 comments

Filed Under: DIY, Guest post

Tags:

Disclaimer: This post may or may not contain affiliate links.
SUBSCRIBE and never miss a thing!

atmgraphiclook

Thanks to Emily at Saving with a Plan for passing along this thrifty tip on how to stain your concrete floors. Oh my word… I totally feel in love with this idea, and it looks amazing! If you would like to be a featured guest post on Look What I Made , watch for our weekly post each Tuesday called A Thrifty online craft fair, link up and you may be selected for our weekly feature post.

Earlier this year we adopted a dog from our local rescue group C.A.R.E.. this dog was not house trained and in our efforts to “convert” him he chewed a massive hole in our living room carpet all the way through the padding. We didn’t want to replace this with more carpet and didnt want the expense of tile or wood floors. We looked at so many options and then ran across information on stained concrete floors. We completed the process which I will show you below and it turned out amazingly well. It would have cost us over $3000 for new carpet and more than that for tile or wood floors and we purchased the items needed to stain the concrete ourselves and instead got the job done for less than $600 and have ended up with a much better outcome in my opinion. No more renting carpet cleaner or freaking out when something is spilled, I just wipe it up and move on!

Here are some visuals of different points in our project. The first step is to remove the existing carpet and padding and then thoroughly clean the floors.

So here we are with bare concrete floors after removing the tack strips and yes that is my huge black dog enjoying the cool concrete. The most amusing factor of the whole project was watching my husband try to use a buffer.

As you can see the tape we laid the lines down to make this look like tile/marble and we did not want to actually cut grout lines into our concrete as we didn’t want our house filled with concrete dust. Always follow the directions on your stain, not following directions caused us to have to do the staining process twice. Here is the result after the second round.

We were finally satisfied with the color so we removed the tape, sealed and waxed the floors after they had completely dried, and there we have the end result. I used a stencil and gold paint to accent the border. In all it took 5 days and it’s pretty maintenance free from there. I do have to re-seal and wax mine occasionally because of my dogs.

UPDATE : Here are answers to the questions your readers had! I’m so glad people are liking the idea.

* The entire process takes 4-5 days depending on how dirty your concrete is. The concrete must be completely cleaned including renting a buffer with a “scratch” pad to get all of the dirt and grime up. It took us 2 days to get the floor clean and the kit that we purchased did come with a special cleaner to help loosen any stains that may be on the concrete. Cleaning is your most important step, if you leave stains they WILL show through. If you have previously had carpet you will need to remove the tac strips which will likely leave holes in your concrete, these must be filled and sanded down. We created an 8 inch border around the entire room and used a vinyl concrete to resurface the border due to the large holes the tac strips left behind.

* We purchased our staining kit from Acidcrete.com, we purchased 2 colors of stain to get the marbled effect and Acidcrete.com has a number of color choices to choose from. Make sure you follow the instructions and use the “Concrete Prep” solution to open the pores of your concrete or you risk the stain acting as a paint instead of actually penetrating the concrete.

* You do have the option of scoring or cutting your concrete and this can be done using a worm drive saw. We chose not to do this because we have kids and pets and I didn’t want to be constantly cleaning dirt out of the grout lines. We made a very intricate border and used 1/4 inch Quilters tape. The tape acts as your grout line, you lay the tape after cleaning your floors. You stain the floors to your desired color, seal the floors and when those steps are complete you remove the tape from the floors leaving you a nice gray grout line. You can purchase the quilters tape at Hancock fabrics and make sure you use the white, the neon colors didn’t stick very well.

* I have not experienced the floors being extremely cold like I expected, they are not nearly as cold as my tile floors. Right now my living room is the only room with stained concrete but we plan to continue it throughout the entire downstairs.

Below is a better picture of the border and tape used to create the grout lines and also the gold stenciling within the border.  Also Youtube has multiple videos on how to stain concrete floors.

Click Here for large image of below

Thank you and feel free to ask any other questions!

Leave a Comment: 13 comments

Filed Under: DIY, Look What I Made

Tags: ,

Disclaimer: This post may or may not contain affiliate links.
SUBSCRIBE and never miss a thing!

It’s Matt – This past week I traveled to Atlanta for a blogging conference. Due to conflicts in our schedule I had to attend the conference by my self and Sarah stayed home with our kids. I was excited that I was still able to attend. Not for what I learned there, although I did learn a lot. But I was excited because I used to live outside of Augusta Georgia, in a town called Martinez. I lived there during my third grade through my 6th grade year and attended Martinez Elementary School.

If you are familiar with Georgia, you will know that Augusta is over 2 and a half hours away from Atlanta. But if you know me I am really big in my history and genealogy. I have always thought it would be fun to go back an see my old homes that I used to live in. So what did I do? Well I rented a car, and reserved the thriftiest price I could find. I arrived late in the night last week and approached the car rental desk. The lady told me that they were busy that day and had rented out all of the economy class cars. She then said that they wanted to give me a higher class car but still keep my price the same as what I reserved. She then asked “Can you drive a stick?”. I smerked  and said “Yes” while my mind raced back to my teenage years and trying every driving trick in the book with my old high school car. What hormone driven male teen hasn’t right? Well she scanned through their inventory and handed me the keys to a Dodge Challenger. Not just some two door V6 model with entry class options, but a V8 HEMI charged with 375 horse power, satellite radio, power everything street machine. When I walked up to the car in the parking bay, I just smiled! This trip is going to be fun! Now I had to make the trip from Atlanta to Augusta. Who wouldn’t want to take this thing out on the open highway?

Yes I enjoyed the ride… I won’t go into details ;)

So yes I drove out to Martinez Georgia to visit my old home. Who knows maybe one of our 8.5 million visitors to our site actually attended the same school back in the mid 1980′s?

For privacy I wont mention the street or the address but there are so many memories of this home:

In the back yard, that is the exact same deck I helped my Dad build. And not sure if you can see just to the right of the deck there is a brown patch of sunken dirt. That is the hole I helped dig to put in our pool. So strange to see it.

Next I went over to my old school. At first the only thing I could remember about the school was a corridor into the gym/cafeteria. In 5th grade I got 3rd place in the school art contest. I was so proud as I walked back and forth in the corridor where they hung the winners art work.

Needless to say, but as soon as I entered the school to ask about old teachers, flashes of past memories started to flood my mind. I visited my old school library and talked with one of the librarians there while I looked in old school year books. One of the only two teachers I remembered – Mrs Powell, and the other Mrs Morris. The librarian actually knows Mrs Powell and she recently retired. It was such an enjoyable day there. I was sad to not be able to meet any of my old teachers.  I even tried to introduce myself to the current owners of our old home, but they weren’t home.

There are no children in these pictures so I will share the photos of the front of the school in hopes one of you might of gone there.

So if you ever get a chance to visit an old home, or old school that you haven’t seen in 25 plus years, I would recommend it! Memories you long had forgotten, will come racing back! Needless to say the rest of my trip was so relaxed in knowing of the satisfaction I gained from cherishing old memories.

Leave a Comment: 7 comments

Filed Under: A Thrifty Dad, My Thoughts, Our vacations

Tags: , ,

Disclaimer: This post may or may not contain affiliate links.
SUBSCRIBE and never miss a thing!

Make this years Valentines Day special without breaking the bank.

My 4 year old wanted to do a craft project with Mom so this is what we made.

 It was fun, and turned out rather cute!

You will need

  • A pair or little hands :)
  • Red paint
  • Paint brush or sponge
  • Card stock… I used a 12×12 sheet cut in half then folded to make a card
  • Marker

handmade valentines idea

On a side note you might want to make sure your little one is wearing an old shirt… cause they always seem to get paint everywhere!

handmade valentines.jpg

Use the red paint to cover the fingers and palm of their hand.  You will need to act quick so it does not dry.  Only do one hand at a time.  We painted her hand 4 times to make 4 cards then switched to the other hand and painted it 4 times as well.

handmade valentines.jpg

Firmly press  hand down, with the thumb pointing down to form half the heart.
childrens handmade valentines idea

 Once the paint is dry write your messages and draw a heart in the middle.

It was a fun little afternoon project!

Leave a Comment: 4 comments

Filed Under: DIY, Thrifty & in Love

Disclaimer: This post may or may not contain affiliate links.
SUBSCRIBE and never miss a thing!

Looking for a new and better way to enjoy the web? Download Firefox 10! It’s perfect with apps that you can add for Twitter, Facebook, and tons of others to personalize your browser! So check it out – and it’s free!

Plus so many times it is Firefox that actually allows coupons to print. The other browsers are particular to so many different things that make printing difficult. So if you ever have trouble printing a coupon, make sure you try to print it in FireFox 10.0

Leave a Comment: 1 comment

Filed Under: Electronic Deals, Trouble printing coupons

Disclaimer: This post may or may not contain affiliate links.
SUBSCRIBE and never miss a thing!