How to Stain Concrete Floors –
DIY Concrete Stained flooring
Thanks to Emily for passing along this thrifty tip on how to stain your concrete floors. Oh my word… I totally feel in love with this idea, and it looks amazing! If you would like to be a featured guest post on Look What I Made , watch for our weekly post each Tuesday called A Thrifty online craft fair, link up and you may be selected for our weekly feature post.
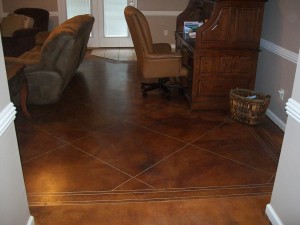
Earlier this year we adopted a dog from our local rescue group. This dog was not house trained and in our efforts to “convert” him he chewed a massive hole in our living room carpet all the way through the padding. We didn’t want to replace this with more carpet and didn’t want the expense of tile or wood floors. We looked at so many options and then ran across information on DIY stained concrete floors. We completed the process which I will show you below and it turned out amazingly well. It would have cost us over $3000 for new carpet and more than that for tile or wood floors and we purchased the items needed to stain the concrete ourselves and instead got the job done for less than $600 and have ended up with a much better outcome in my opinion. No more renting carpet cleaner or freaking out when something is spilled, I just wipe it up and move on!
Here are some visuals of different points in our project. The first step is to remove the existing carpet and padding and then thoroughly clean the floors.
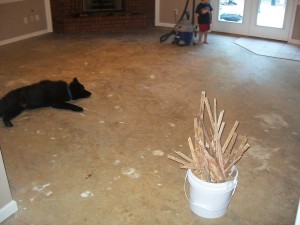
So here we are with bare concrete floors after removing the tack strips and yes that is my huge black dog enjoying the cool concrete. The most amusing factor of the whole project was watching my husband try to use a buffer. It’s also great to use some red liner tape to mark out areas very clearly and the colour makes it stand out which is important.
As you can see the tape we laid the lines down to make this look like tile/marble and we did not want to actually cut grout lines into our concrete as we didn’t want our house filled with concrete dust. Always follow the directions on your stain, not following directions caused us to have to do the staining process twice. Here is the result after the second round.
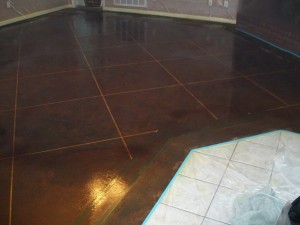
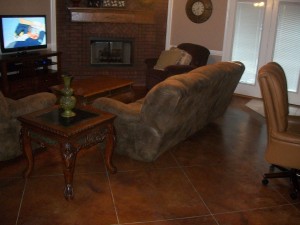
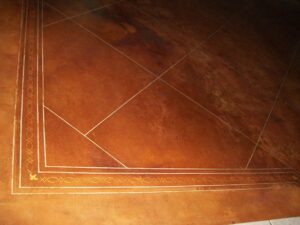
We were finally satisfied with the color so we removed the tape, sealed and waxed the floors after they had completely dried, and there we have the end result. I used a stencil and gold paint to accent the border. In all it took 5 days and it’s pretty maintenance free from there. I do have to re-seal and wax mine occasionally because of my dogs.
UPDATE : Here are answers to the questions your readers had! I’m so glad people are liking the idea.
* Excellent Source for Concrete Stain
* The entire process takes 4-5 days depending on how dirty your concrete is. The concrete must be completely cleaned including renting a buffer with a “scratch” pad to get all of the dirt and grime up. It took us 2 days to get the floor clean and the kit that we purchased did come with a special cleaner to help loosen any stains that may be on the concrete. Cleaning is your most important step, if you leave stains they WILL show through. If you have previously had carpet you will need to remove the tac strips which will likely leave holes in your concrete, these must be filled and sanded down. We created an 8 inch border around the entire room and used a vinyl concrete to resurface the border due to the large holes the tac strips left behind.
* We purchased our staining kit from here, we purchased 2 colors of stain to get the marbled effect- Here are a number of color choices to choose from. Make sure you follow the instructions and use the “Concrete Prep” solution to open the pores of your concrete or you risk the stain acting as a paint instead of actually penetrating the concrete.
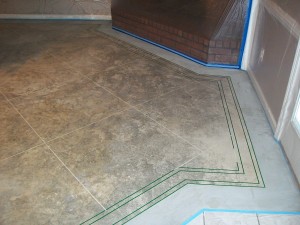
* You do have the option of scoring or cutting your concrete and this can be done using a worm drive saw. We chose not to do this because we have kids and pets and I didn’t want to be constantly cleaning dirt out of the grout lines. We made a very intricate border and used 1/4 inch Quilters tape. The tape acts as your grout line, you lay the tape after cleaning your floors. You stain the floors to your desired color, seal the floors and when those steps are complete you remove the tape from the floors leaving you a nice gray grout line. You can purchase the quilters tape at Hancock fabrics and make sure you use the white, the neon colors didn’t stick very well.
* I have not experienced the floors being extremely cold like I expected, they are not nearly as cold as my tile floors. Right now my living room is the only room with stained concrete but we plan to continue it throughout the entire downstairs.
Below is a better picture of the border and tape used to create the grout lines and also the gold stenciling within the border. Also YouTube has multiple videos on how to stain concrete floors.
Click Here for large image of below
Related Post:
Kitchen Remodel – Long Three Years But Well Worth Staying Out of Debt
See how we turned a kitchen from 1972 into a model kitchen without going into debt.
From This:

To This:

**********************
Try Prime for FREE!
Looking for More Online Deals? Click here for more THRIFTY DEALS. Please note that Amazon priced tend to change often so prices may be higher or lower without notice.
Stained concrete and ceramic tiles are great floor options. I bought mine at https://plus.google.com/b/103307002861242660093/+NorthlandConstructionSuppliesRedDeer
Awesome post, thanks for sharing. I’ve had to pull up many stained concrete floors and it was very expensive for the owner. I am happy to answer any questions on the removal of concrete. http://www.concretecuttingmelbourne.net.au
I love the concept of the design. For more design on polished concrete, visit us. http://www.grindnshine.com.au/
Your results turned out amazing! I definitely love the darker color over the light you had before. I do not trust myself to do DIY’s, so I may have to look to a professional for help if I did this. I think it would look awesome on my patio! http://www.enduracoat.net/EnduraColor-Reactive-Concrete-Stain-Quart/dp/B00528D43K
I’ve heard a lot about concrete staining, but I didn’t think that it was something I could do on my own. I never would’ve guessed that your floors were concrete just by looking at it. I really want to try this now, thank you for this walk-through on how to do this, I appreciate it! http://www.atlaspolishing.com/polished-concrete
I cant believe how great the concrete staining looks! We are needing to hire some concrete contractors soon and will have to consider doing this. I will have to look more into the staining procedure and see what my wife thinks. Thank you so much for posting this as well as the pictures! http://www.andreasconstruction.com/res.htm
This is very impressive. I wouldn’t have guessed that the end product used to look like a dirty garage floor. We’ve been debating whether to cover our concrete or stain it, but I’ll show this to my husband when I get home and see what he thinks. Thank you 🙂
southwestcoatingsolutions.com
Thank you for sharing. We are going through renovation in our home and I really need inspiration! It’s great that you shared your personal experience! You gave me really motivating ideas!
Greets!
Merton Carpet Cleaners Ltd.
http://mertoncarpetcleaners.org.uk/
I would love to do something like this in my home. My boyfriend and I are going for a new look. Right now, we have a carpet, but it gets so dirty! Concrete seems like it would be much easier to clean. How long does this kind of project take? http://www.accoc.com.au/team
Wow! This concrete flooring looks amazing! It looks like a professional did it! Where did you find the instructions on how to do this yourself? I would like to do this in my house. What kind of stain did you use for your first picture? I really like that brown color.
http://www.leesurepools.com/pool-remodeling
Sarah, these floors look great! One of my good friends recently bought a home with concrete floors and she has been trying to decide what she wants to do to improve the look of them. I’ll have to show her these photos! She’ll be blown away by the possibility of staining her concrete floors! However, once I do that, I’ll be signing up to help her with the project! http://www.kwiatkowskiconcrete.com/services
Wow! Your floor looks amazing! I had no idea you could have a concrete stained floor. I also think it is incredible the whole process only took 4-5 days. Was it pretty easy to put the tape down to mark your grout lines? I definitely want to try this at my house. Do you think staining would work outdoors, too? http://www.hardrockdevelopments.com/decorative/stains/
For a DIY job, it’s actually really well done. I am very impressed with the design and flawlessness of the work. Just goes to show that even the most complicated things can be done on your own, http://psames.com/en/ames_construction__remodeling/basement_finishing/
I really like the color of your floors. Knowing how concrete and store work is key to your project. You need to have the knowledge and necessary guidance to achieve similar results, as it is shown in the pictures above. Therefore, get the right skills and combine them with the right tools, and you are set to go. Good luck!
http://www.impressionsconcreteandstone.com/products.html
The staining definitely makes the room look better. Did it make in impact on cleanliness? I think that it would be easier to clean with this kind of flooring. If it doesn’t help with cleaning, it at least looks cleaner. http://www.mifloorsanding.net.au
Your floor looks amazing with that staining! I never would have known that you did that yourself! It is very impressive. I think that you were wise to not cut actual grout lines. It would have been hard to clean and would have changed the overall look of your floor.
http://southwestcoatingsolutions.com
Don’t do it, the floor becomes way too slick and you are likely to bust your butt if you walk on it regularly ever.
I found Awesome company
who serve Flooring they offer best service and provide all types of flooring http://efloorsusa.com/
This is a great tutorial. I would suggest visiting http://decorativeconcretediy.com/ for a more detailed look at staining concrete floors.
WOW!!!….your website is amazing and very informative. i really like your this post the tips which you have provided here is very interesting …..Thanks for sharing
I’m impressed with the results. It’s a lot of work for one person. This is definitely not a project to rush on or into. I’d suggest one take the time to plan each step. DIY usually takes twice the time one originally planned to take.
Great Staining!! A floor looks fabulous in that colors….. I liked the first picture the most…But now so many Such so many options are available like wooden floors, hardwood floors, solid oak floors etc. Keep updating and keep checking the newer options also.
Thanks for sharing this and i like this unique content
Floors look great, I will be doing mine soon. The question I have is what did you do about the space left from when the carpet and tack strips were removed? (The gap from bottom of trim to the floor)
Hello Love Love Love what you did with your floor! Can you please tell me what two colors you used? Thanks!
Emily,
Great work!
Are either you or your husband a professional in this kind of work or DIYers? My husband and I have NO experience in resurfacing and staining concrete but are eager to try ourselves sot save money.
Angela
we just acid stained our concrete and sealed it…however it looks very spotchy with the shine. we want to put a wax on it to make it all shiney, but haven’t found one that is specific to acid stained concrete floors. which wax do you use?
I would like to do this throughout my whole house but I don’t want to do it myself . I would like to hire some one to do it. I have carpet and tile in my house
Beautiful floors! I want to do this to my basement. Even the same color. Why did it cost $600 when the stain is only $36 each? What else do you have to buy? Do you have a step by step walkthrough? Thanks for the information!
@Ginny – If you are interested, I created a step-by-step guide @ decorativeconcretediy.com
The floors in this post look great! Nice job, @athriftymom!
Wow!! I am very impressed. I kinda wish I had concrete floors to do this. It looks so classy – and expensive to someone who would know it was a DIY project! Thumbs up!!!
We considered doing this when we removed our downstairs carpet that had been in since our home was originally built. When we removed the carpet, we had a couple of settling cracks in the flooring. Did you have cracks, and what did you to “fix” them before creating this beautiful floor? Also, did you have to lower your baseboards? They looked silly in my house being up so high off the concrete floor once the carpet was removed, that we figured it would be necessary to either replace or move them so they looked better if we went with the stained concrete route.
I noticed that you have a tile entry. How did you solve the height difference problem between the cement floor and the tile entry? We have uneven floors due to different flooring materials in our house too, and aren’t satisfied with the solutions to the difference in heights. Our kitchen floor is wood and it butted up against carpet, but when we replaced the carpet with Pergo, the builder didn’t think to lay down a thin sheet of plywood to make the two floors match in height, so we have a very awkward, and now breaking, piece of wood that was made at an angle to try to smooth the height transition. Elderly family members always have stumbled over it.
I think your floor looks gorgeous. I appreciate that you shared it with your readers!
Yes, please explain what colors you used and method for spraying the colors.
@NewHomeowner0807 We purchased our staining kit from Acidcrete.com, we purchased 2 colors of stain to get the marbled effect and Acidcrete.com has a number of color choices to choose from. Make sure you follow the instructions and use the “Concrete Prep” solution to open the pores of your concrete or you risk the stain acting as a paint instead of actually penetrating the concrete.