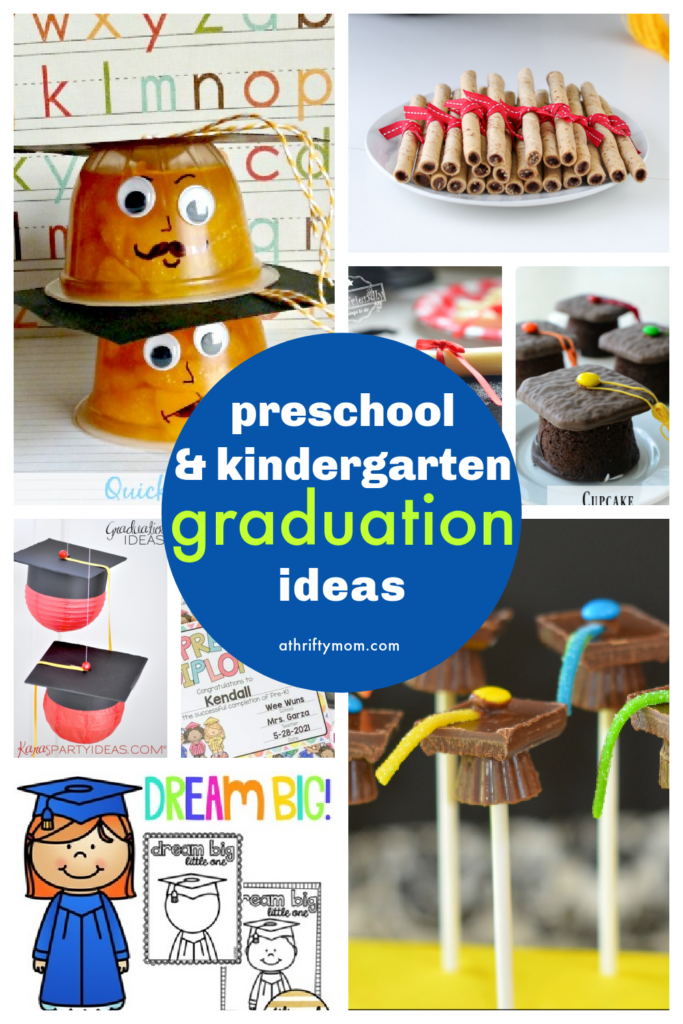
About Us

About Us

I am a stay at home mom with four wonderful kids. I have been married for over 10 years to my best friend. I am head over heels in love with him. He always supports my crazy "thrifty adventures". We have a lot of fun together.

I was raised on a small dairy farm. Where I learned very young, the value of hard work and how to be thrifty in all areas of life. Growing up our meals were made from scratch. Only on special occasion would we get name brand cereal, chips, or any other fancy treats. Now that I am a Mom with my own budget, the basic foods always comes first. I too make most of our meals from scratch and take pride in feeding my family a well balanced healthy diet.

I enjoy seeing how far I can make our budget stretch, and when I take the time to match sales with coupons I am able to get all those "fun & fancy" items that would other wise be out of my budget. Being thrifty has always been a way of life for me, but it has also become a real joy.

Also learn about another member of our team - Ingard.

Subscribe to our Emails

Grab My Button

A Thrifty Mom Logo
Make sure you scroll up and down inside the box to copy the entire code for it to work.

Categories

Exclusive Macys Coupons

Design custom save the date
cards

Checkout Couponsnapshot.com

Learn a new craft and save!

If you are like me I love making things that are useful, cute, and handmade. But I don’t know how to do it all and I love learning new cute ideas! Craftsy is a great place for a couple reasons:

1) Terrific online classes from amazing instructors for beginning, intermediate and advanced quilters, knitters, crocheters, sewists, jewelry makers, and other crafters.
2) Astonishingly good deals on crafting supplies: organic yarn, lovely fabrics and fat quarters from top designers, high quality needles, etc…

So while the cold winter weather sets in, don’t go crazy with nothing to do… Go to Craftsy to learn a new craft and get some great deals!

Thrifty DIY Candy Dish ~ Flower Pot Gumball machine

My friend Leslea made me this adorable candy dish for Christmas.  The photo’s does not do it justice, I wish you could see it in personl. It is really cute!

BUT I loved it even more when I realized what she made it out of…….  Can you tell… look hard.

The base is a clay pot pot turned upside down, and painted black.  The lid to the candy pot is the base of the clay pot also painted black and turned upside down.


The candy dish is a fish bowl….. Looks like she used gorilla glue or something to attach it to the base.

Last but not least a wooden ball, also painted black attached to the top as the handle to the candy jar.

She made mine out of a clay pot, and a glass bowl, so I am just praying my kids do not bust it into a million pieces.  To make it a little more kid friendly you could make it out of a plastic pot and a plastic fish bowl.  Either way, I love mine …thanks again Leslea.

Cute wall decals as low as 2 bucks with free shipping

Get any of these cute wall decals for as low as $2.37 and as high as only $8 bucks..AND ALL WITH FREE SHIPPING – yeah!!! Get yours and many other decals here- Focalprice,Free shipping!

Pom Pom’s from T-shirts – Thrifty Crafts

We all love to try and be creative. Some times it takes a couple little hints from someone who is really good. Here is a step by step instruction on how to make Pom Pom from old t-shirts. We would like to thank Carrissa from Living Live and Loving Every Second for sending this our way

Here is the picture of the pom poms they made!

First things first you need to find a t shirt.

I only used from the arm pit down of the shirt and then cut thin strips….after this step is done you need to cut two pieces of card board in the shape of a (C) You can see what I mean with the picture above. You take one piece of the t shirt and wedge it in the middle of the card board (This is so you can tie it after all is wrapped and cut!

You will want to wrap it three times around and once you do that you can use scissors or use an Exacto knife which is sharper and way faster *Hint* Hold your hand down holding the t shirt in place while cutting.

After you have cut all the way around you take the two pieces that you tucked into the cardboard and tie them tight….all of the fabric will gather. Once you have tied it you can remove the card board and fluff it up!

Next is just to hang and ENJOY!

Easy-to-Follow Step By Step Instruction on how to Create a Scrapbook

Sarah used to scrapbook every chance she had when we were first married. Now she is so busy she only does it every so often. We wanted to help our readers learn how to scrapbook. Some times just the idea for some to be creative can be difficult. Scrapbooking can be fun and easy. So one of our friends – Tiffany – will be do frequent Easy To Follow posting to help those who want to learn, and give tips for those who are a little more experienced.

1.Decide on a theme.
I have made scrapbooks of weddings, birthdays, pets, new baby, weekend get-a-ways …
pretty much anything that my little heart desires! The possibilities are endless!

2. Gather your pictures
Gather up your pictures that you want to use for this project. How
many pictures you have will help you to decide what size scrapbook to purchase.
Speaking about sizes, there are many to choose from. Small 6″x6″ scrapbooks are great
for making a brag book to show off that new pet or new addition to your family.
8″ x 8″ are my favorites. These are small enough to work with that I don’t get overwhelmed. They
don’t require as many pictures or as much paper as the 12″x12″ size. However I have several
12″ x 12″ scrapbooks that I have done for family vacations. It is totally a personal preference!

3. Gather supplies:
Scrapbook
Pictures
Cardstock for mating your pictures
Neutral (acid free) cardstock for pages
Paper cutter. (this gives straighter lines, but scissors can also be used.)
Adhesive (I use TOMBOW ‘s mono multi liquid glue)
Embellishments to decorate your pages
A local craft store will have a selection of scrapbooks, cardstock, and
embellishments to choose from.
I know embellishments can be totally overwhelming
Start simple. Some favorites of mine are ribbons, buttons, rub-ons, and stickers.
These can be found in any color to match your theme.

4. Background pages.
(The pages you will eventually glue your pictures onto.)
Depending on the size of the scrapbook you have chosen, you may need to
cut your paper to fit your pages. Cut enough for each page and insert into
page protectors for protection until they are needed.
Most scrapbooks come with pages already in them. However, I am not a big fan of white as
most of them are, so I change mine to a color of choice.

5. Crop and Mat your pictures.
Either single or double mat your pictures.
“Crop” means to cut off the messy or unimportant part of the picture, making your subject
the main focus. “Mat” means to place your picture on a piece of cardstock with an equal border
around each edge. If you are nervous about cropping your pictures, print doubles!

6. Divide your pictures according to how many pages you have.
For the 6″ X 6″ only one picture will fit per page.
The 8″ x 8″ can hold one or two pictures per page.
The 12″x12′ can fit three to four pictures per page.

7. Arrange mated pictures on onto page.
Do NOT glue yet! Move the pictures around
on the page until you like the way they look together. After you have decided
where the pages look best, glue them into place.

8. Add embellishments or captions to your pages.
Personally, I only work on one or two pages at a time. This helps me not to feel
rushed or overwhelmed. When you are placing your embellishments be careful
not to “over-do” it. Your pictures are your main focus, your embellishments
compliment the pictures and should not be the main focus of the page.

9. Protect the finished product.
After each page is completed, slip it back into the protective
sleeve. I have ruined completed pages by spilling glue so I always
place the page into the scrapbook as soon as it is done.

10. Share Your Creation!
Your scrapbook is now complete! Your
scrapbook is a unique gift from the heart that can not be
duplicated. Unfortunately, after I complete a scrapbook, I want
to keep it!  But hey, guess now I will just have to make one for myself!


Remember, a photo album shows pictures, while a scrapbook can
tell a one of a kind story! Until next time, Happy Scrapping!

Sandwich box made from Milk Jug – and a few more fun crafts

Even using coupons, the back to school supply lists can take a toll on your weekly grocery budget. I found a couple neat ideas on reusing items around the house for school lunch supplies and can’t wait to try them out! These look like items even a non-crafty person like myself could successfully create!
This first idea is from Family Fun magazine. Don’t throw out those used milk jugs!

With just a few snips, you can create a set of cool, eco-friendly, reusable snack and sandwich containers from juice cartons and milk jugs. They’re food-safe, easy to rinse clean, and absolutely free, so it’s no biggie if they get tossed accidentally. Let your kids decorate the boxes with stickers and permanent markers for an even more personalized look.

1. SANDWICH BOX: Mark a clean 1-gallon milk jug as shown.
2. Cut along the lines with scissors. To make the crease lines, use a thumbtack to pierce a row of dots at 1/4-inch intervals across each side of the jug, 1 3/4 inches up from the bottom.

3. Fold the flaps at these dotted lines, then open them and fold them in the opposite direction along the lines (this will make the flaps easier for your kids to open and close). Fold up the box and add an adhesive-backed Velcro dot closure.

SNACK BOX: Use a clean juice or milk carton. Cut off the top, then cut the sides into flaps as shown. Carefully crease the flaps, then fold them down and add an adhesive-backed Velcro dot closure.
These cute bags made out of Capri Sun juice pouches are popping up everywhere. Why not make a lunch totes for your kids?! Save $ and learn how to make them here.

I think these would also make a fantastic reusable grocery bag! This is one my friend Ginny made. {Insert shameless plug for Ginny to make me one for my birthday! }
Do you have a creative idea on how to save money be reusing an item? Please share! I love hearing new thoughts and ideas!

DIY – Make your own cheese

Well it’s Matt. My whole life I have been the type to try and figure things out for my self. I love trying to make things that many think is too hard. Well about 6-8 years ago I was watching a show on making cheese, and I thought – I can do that. So I searched the internet and found a kit to make cheese from home. It is actually pretty easy to make mozzarella cheese. Every now and then I break out the kit I bought 8 years ago and make a pound of cheese for pizza or cheese on tomatoes, or just for fun.

DIY - mozzarella cheese

DIY - mozzarella cheese

To make one pound of cheese you need one gallon of milk. We had two different milks that were both about half full that I added together. They were close to expiring and I had just bought new milk. So in the pot they went.

Here is how:

You need a cheese making kit. The one I have had I have made about 6 pounds of cheese and I haven’t even used 1/4 of the ingredients. It keeps well in the back of the fridge.

One cheese making kit - Rennet, Calcium Chloride, Citric Acid, Mild Lipase Powder, Flaked salt

One cheese making kit - Rennet, Calcium Chloride, Citric Acid, Mild Lipase Powder, Flaked salt

The one I used is from Leeners – $24.95
Leeners Mozzarella and Ricotta Cheese Making Kit
Or this one for $18.50 – I haven’t used this but I’m sure it’s similar.
Roaring Brook Dairy Mozzarella Cheesemaking Kit

Follow the instructions but basically you need:

  • pot large enough to hold a gallon of milk,
  • One Gallon of milk (whole milk is best – cheese needs high fat content)
  • One cheese making kit – Rennet, Calcium Chloride, Citric Acid, Mild Lipase Powder, Flaked salt
  • large spoon with holes for draining
  • 5 small bowls to have everything pre-measured
  • a large microwave safe bowl
  • thick rubber gloves (I used 5 pair of latex gloves but the thick rubber kitchen gloves would work too, clean)
  • one cooking thermometer


Start by pouring 1 (one) gallon of milk into the pot. Whole milk is best cheese is better with higher fat content. I have even made it from raw milk at Sarah’s parents house, they are dairy farmers. Some risk involved with raw milk.

Slowly warm the milk on low to medium heat. Slower the better, scalded or burnt cheese probably doesn’t taste that good.

While the milk is warming start preparing the additives

In one small bowl add

1/2 tsp of Rennet with 1/4 cup of distilled (I use tap) water

Next bowl :

1 tsp calcium chloride liquid mix with 2 Tbs of distilled (or tap) water

Next Bowl:

Measure 2 tsp of citric acid powder

Next Bowl:

Measure 1/2 tsp of Flaked salt. To be added while stretching the cheese in the last process

Next Bowl :

Measure 1/4 to 1/2 tsp of mild lipase powder. Optional if you are vegetarian.

DIY - Mozzarella cheese - Milk with Citric Acid, curd forming

DIY - Mozzarella cheese - Milk with Citric Acid, curd forming

Closely watch the temperature of the warming milk. Add the citric acid while it is warming. Stir the citric acid for 30 seconds.  You will begin to see the milk separate and form curds. Continue to  stir once every minute or so. Once it reaches 88 degrees F add the calcium chloride mixture and the lipase powder. Stir the mixtures slowly for 30 seconds. Let the mixture continue to warm to 105 degrees F.

DIY - Mozzarella cheese - 105 degrees, Citric Acid, Rennet, Mild Lipase Powder

DIY - Mozzarella cheese - 105 degrees, Citric Acid, Rennet, Mild Lipase Powder

Once 105 degrees F has been reaches cover and turn off the heat. Let the whey and curd mixture sit at 105 F for 15 minutes to allow the curd to fully develop. The curd is the white clumps and the whey is the greenish clear liquid in the pot.

DIY - Mozzarella cheese - Cover and let sit with heat off

DIY - Mozzarella cheese - Cover and let sit with heat off

After 15 minutes gently take out the curd with the slotted spoon. Put the curd into your microwave safe bowl. Try and remove as much curd from the whey as you can.

DIY - Mozzarella cheese - After 15 minutes remove the curd, place into microwave safe bowl

DIY - Mozzarella cheese - After 15 minutes remove the curd, place into microwave safe bowl

Gently press the curd mixture with your gloves on. Pore the whey back into the pot. Press and pour this step until not much is being squeezed out.

DIY - Mozzarella cheese - press out as much whey by hand

DIY - Mozzarella cheese - press out as much whey by hand

Now place the bowl with the curd mass into the microwave. Heat on High for ONE minute. Remove and press the mass to try and remove any more whey liquid as you can. Repeat this pressing and pouring till no more whey can be removed – about 30 seconds or so.

DIY - Mozzarella cheese - Place in microwave, cook on high one minute

DIY - Mozzarella cheese - Place in microwave, cook on high one minute

Place back into the microwave for ONE minute again. Remove the cheese and press and pull the cheese similar to making taffy. Add the remaining flake salt while you are pulling and stretching the cheese. The more you pull the firmer and stringing it will become.

DIY - Mozzarella cheese - Continue to squeeze the whey out, place in microwave again for one minute

DIY - Mozzarella cheese - Continue to squeeze the whey out, place in microwave again for one minute

DIY - Mozzarella cheese - Add the Flaked Salt and stretch and pull cheese

DIY - Mozzarella cheese - Add the Flaked Salt and stretch and pull cheese

This is where I stopped microwaving it, but for a more firm cheese repeat the microwave step again.

At this point the cheese is very hot and this is where thick gloves comes in handy. I wore 5 latex gloves on each hand and it was still VERY hot.  Stretch and pull the cheese just like taffy makers. The more you pull and stretch it the more stringing and firm it becomes. For a softer cheese only pull and stretch for a short time, maybe one or two pulls then form your cheese ball.

DIY - Mozzarella cheese - Stretch and Pull the cheese and work the curd together

DIY - Mozzarella cheese - Stretch and Pull the cheese and work the curd together

Form the cheese the way you want, place in an air tight container. In the fridge it is good for about one week, and in the freezer for about a month.

DIY - Mozzarella cheese - Form a tight cheese ball with the flat of your palm and press your fingers upward on the bottom middle of the cheese mass.

DIY - Mozzarella cheese - Form a tight cheese ball with the flat of your palm and press your fingers upward on the bottom middle of the cheese mass.

If the cheese is too soft to grate, place in the freezer to firm the cheese for grating. ENJOY!

How do you like your cheese?


DIY - Mozzarella cheese, Tomato, Olive Oil, Salt and Pepper, Basil

DIY - Mozzarella cheese, Tomato, Olive Oil, Salt and Pepper, Basil

Thrifty Ideas for Teacher Appreciation Week?

Got this from my inbox,

Help!! Teacher appreciation is next week (May 2nd-May 6th) and I am having troubles finding the perfect gifts to send in!! Our children have AMAZING teachers and we would like to send something in with them daily to let them know how much they mean to us. With all the budget cuts to our school district (they are even reducing the number of teachers in the district) it is very important to use to show our teachers that we support and appreciate them. Any thrifty ideas??? Thanks for the help!!

What are your ideas?  I would love to hear our readers feedback on this one!

We all know Teachers do not get paid what they should, personal care products are pricey so why not share a little coupon love and give a basket filled with items that we couponers are able to score for $1.00 or less… most the time FREE.


Here is a How Too idea post I did a few years back.. You can add a Gift Card, or Movie Tickets to spice it up a bit.

Lots of great deals on Spring plants.  Skip To My Lou has a free EDITABLE version of this printable!  Just type in your child’s name and click PRINT!

Add some movie tickets to these cute bag toppers by Domesticated Lady (free printable). Watch her FREE tutorial for making the cookies.  Or add some Popcorn, and some goodies if you are not feeling up to baking.

More more Ideas Check out Moms By Heart and Skip to My Lou

Three Free Mothers Day cards

Tiny Prints has you covered this year for Mothers’ Day with their Tiny Prints Greeting Card Collection, which lets you create individual personalized cards with photos starting at $1.99. They have cards for everyone in your life from your mom, to your grandmother, sister, daughter or anyone else important to you.  In a matter of seconds, you can create personalized Mother’s Day Cards and have Tiny Prints mail them directly to you or the recipient.  No more scouring the racks at your local convenience store for a lame last minute card, Tiny Prints has removed the hassle and added the fun back into Mother’s Day shopping with a personal touch.

As an extra bonus, from April 6th to April 12th, all Mother’s Day Greeting Cards will be $.99 cents and you can also sign up for a Free Greeting Card Membership, giving you three FREE cards to use right away, as well as discounts on future cards.


Don’t loose the pacifier

If you have a baby in your house you are all too familiar with the pacifier.  Or  you might know it as the Binky, the plug or a BAAA ( that is what we call it at our house) With my first 2 kids I think I bought a package of binkies every month. They are not cheep, about $4 a package.  We were always losing them, at the store, church or in the car.  At night I was always on my hands and knees looking  for it in the dark, as my baby screamed at the top of her lungs.   I kept thinking there has to be a better way.  One night I had an idea, at 3 o’clock in the morning I found a needle and thread and  I sewed the binky to the corner of the her snugly blanket.

Just tuck the corner of the blanket  through , and make a simple X.  This makes it easy to take out when you need to wash the blanket.  It takes less than a minute, so simple!

It has worked great for us.  I never had to buy another binky!  Now instead of looking for a tiny binky we just look for her blanket.  Another great thing is, my daughter holds her blanket.  So when she spits her binky out it does not fall to the ground and get all dirty.  This might not be the best idea for a tiny baby, being  that they can’t pull the blanket away from there face.  So use a thin blanket, and your own judgement

Page 1 of 512345