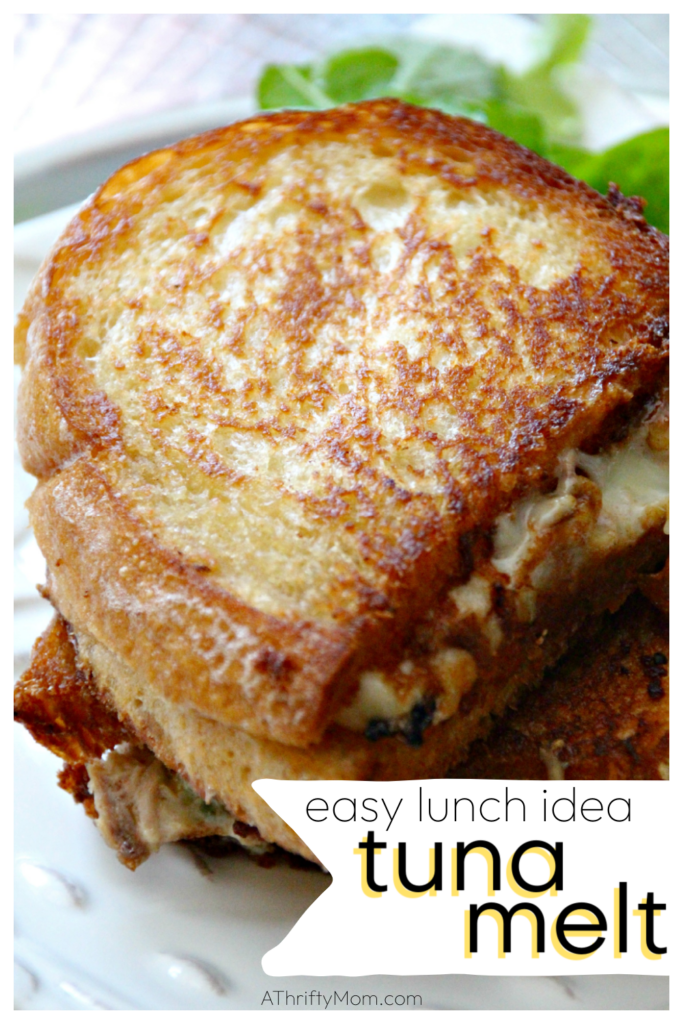
Roast Beef Potato Rolls

You will need
- Deli style sliced roast beef 6-8 large slices or 12-14 small
- 3-5 cups mashed potatoes
- 2 cups grated cheddar cheese (save 1 cup for top)
- 2 cups brown gravy
- 9×13 pan, buttered to prevent sticking.

Lay your roast beef flat, in the middle of each one add a row of mashed potatoes and top with cheese.

Wrap and overlap the ends of the roast beef to create a tight roll, place in a buttered baking dish.

Sprinkle the top with 1 cup cheese, cover with foil and bake in a 350 degree oven for 20-30 minutes. If the mashed potatoes are hot when you make them it will only take 15-20 minutes to cook. But if they are cold you will need to the full 30 minutes cooking time.

Top with brown gravy and enjoy!

Tagged as:
#DinnerIdeas,
#Recipes,
Roast Beef Potato Rolls Recipe
Disclaimer: This post may or may not contain affiliate links.
SUBSCRIBE and never miss a thing!

Loaded Chicken Nachos by Tiffany
Have you totally been guilty, like I have, for buying loaded nachos with all the fancy smancy flavorful shredded meats, melted cheeses, etc. at your favorite restaurant? I’m going to save you some money, are you ready?! Best of all, you get your crock on! Whip that baby out from under the counter, I’ve got a tasty shredded chicken recipe for you! This shredded chicken recipe is very versatile and can be used for nachos, tacos, enchiladas or empanadas.
Sometimes I just need my ooey gooey cheesey chicken nacho fix. Especially on those hectic nights when I don’t feel like cooking up a big ol’ meal. Super duper easy and very very tasty! Plus, it’s a kid pleasing meal! Enjoy.
Notes***
You can totally replace the diced tomatoes and green chilies for 1 can (15oz.) of Rotel tomatoes instead.
This makes approx. 6 cups of shreded chicken breast. Use or freeze the remaider for later use.
This can be made kid friendly by just leaving out the toppings your child does not prefer.
Ingredients
- 1 can (14 oz) diced tomatoes
- 1 can (4 oz.) diced green chili’s
- 1 heaping tablespoon chili powder
- 1 tablespoon chopped dried onion
- 1 heaping teaspoon ground cumin
- 3 boneless skinless chicken breast
- sprinkle of chipotle chile pepper
- tortilla chips
- shredded cheese -Mexican, cheddar or pepper jack
- 1 can (15oz.) black beans, drained and rinsed.
- diced onion
- diced tomatoes
- sliced olives
- fresh chopped cilantro
- sliced jalapeno peppers
- sour cream
- salsa
Directions
- In your crock pot or slow cooker, combine diced tomatoes, green chili’s, chili powder, dried onion, ground cumin; stir. Place chicken breasts in crock pot and scoop some of the tomato mixture on top of breasts. Sprinkle the tops with chipotle chili pepper. Turn crock pot on high, cook for approx. 3-4 hours or until breasts are easily shredded with a fork.
- Shred chicken breasts in crock with tomato mixture. Stir and set aside. Keep on warm until ready to use.
- On a large baking sheet, layer tortilla chips. Top with shredded chicken, cheeses, black beans and all your desired fixings, except for sour cream & salsa; repeat for second layer. Bake in a preheated 400 degree F. oven until cheese has melted. Approx. 8-10 minutes. Top nachos with sour cream,salsa and fresh chopped cilantro if desired.
Tagged as:
Crockpot Recipe,
Kid Friendly Meals,
Loaded Chicken Nachos,
money saving recipe,
The Best Chicken Nacho Recipe,
The Best Shredded Chicken Recipe For Tacos
Disclaimer: This post may or may not contain affiliate links.
SUBSCRIBE and never miss a thing!
It is that time of year again… Graduation time! Lots of parties and memories to be made! If you are looking for a festive fun little treat to bring the party, take a peek at these Graduation Hat Pops. They are quick and easy and lets face it CUTE as can be. Plus you can make them in lots of colors to make them fit your school colors.

To make these you will need:
- Mini M&Ms
- Mini Reeses (come in a bag in the candy bar section of the store)
- Mini Hershey’s plain chocolate bars (came in an 8 pack in the candy section)
- Air Head Extremes
- Sucker sticks

Start by unwrapping you mini chocolate bars and cutting them into 2 squares. You will have one skinny piece left over save that to melt for putting them together. You do not need them all so if you need a chocolate fix go ahead and eat one

Take the skinny piece of chocolate left over and melt it so you can use it as “glue” to put your caps together. I put mine in a glass bowl for 3o seconds, they do not look melted but once you touch it, it is soft and melted. Gently twist the sticking into the wide end of the reeses mini. Then dip the skinny end in chocolate and “glue” it to the bottom of the square piece of chocolate. You will want to make sure you stick it to the side with words, so the smooth side will be the top of your cap.

If you are in a hurry put them in the freezer to harden the chocolate, I just let them set a few hours then came back to finish after the chocolate had set.

Use scissors to cut the air heads into thin sections, attach them with melted chocolate to the top of the cap. Top it off with a mini M&M. I made a stand to hold mine out of scrapbook paper and a styrofoam block.

Tagged as:
Graduation Cap Pops,
Graduation Treats,
Hershey's,
Reeses,
Simple DIY treat ideas
Disclaimer: This post may or may not contain affiliate links.
SUBSCRIBE and never miss a thing!

Blueberry Nanner Bread by Tiffany
My kids are little monkeys! I tell you, I can’t keep enough banans around. If I ever want to make my Blueberry Nanner Bread, (silly name my kiddos gave this bread.) I actually have to put some aside with a note that says… “If you want some nanner bread, pleeeease don’t eat these.” Yes, it has come down to leaving notes on anything I don’t want eaten in my home. My mom never had that problem with us girls, we hardly ever ate. Raising teenage boys is a totally different story. Whew! They eat us out of house and home. They graze alldaylong. Wish I had their hollow legs! I look at food, and BAM! It immediately goes straight to my thighs. Not fair, not fair at all! Just sayin’.
NOTES***
I use organic evaporated cane juice sugar. Just replace equally with regular white sugar.
Ingredients
- 1/2 cup salted butter, room temp.
- 1 1/4 cup organic evaporated cane juice sugar
- 2 large eggs, room temp.
- 1 tablespoon pure vanilla extract
- 4 very ripe bananas
- 2 cups unbleached all-purpose flour
- 1 teaspoon baking soda
- 1 1/2 cup frozen blueberries
- 1 cup chopped nuts, optional
Directions
- Preheat oven 350 degrees F. confection setting.
- Grease and lightly flour a large loaf pan, set aside
- In your standing mixer, cream butter and sugar. Beat in eggs, vanilla and bananas. Slowly stir in flour and baking soda. Once incorporated, beat for approx. five seconds on high speed.
- Fold in blueberries and nuts if using.
- Pour batter into approx. 10×5 prepared loaf pan. Bake for 1 hr. 40 minutes or until toothpick inserted in the middle of loaf comes out clean.
Disclaimer: This post may or may not contain affiliate links.
SUBSCRIBE and never miss a thing!

Did you know that you can make Caramel Dip with only ONE ingredient. All you need is a can of Sweet and Condensed Milk.
First take the label off your can, then place the unopened can in your crock pot. Cover the can with water, turn the crock pot on high put the lid on and WALK AWAY! Set the timer for 4 hours, open the can and enjoy some amazing caramel. Yes easy as that you will have yummy caramel dip.
I was away longer than I thought so mine cooked about 6 hours… oops. So it was a little darker than normal. If you cook it 4 hours it will be a lighter golden caramel color. If you do not have a crock pot you can cook it on the stove, bring to a boil for an hour… but I would not leave it unattended. That is why I like to do mine in the crock pot.
Tagged as:
Caramel Dip Recipe,
Only one ingredient in the crock pot,
Sweet and Condensed Milk
Disclaimer: This post may or may not contain affiliate links.
SUBSCRIBE and never miss a thing!
Shredded Beef and Cheese Biscuit Rolls Recipe
Don’t forget to PIN it so you can make it later.
Start by making your biscuit dough or used premade dough.
Baking Powder Biscuits ( from Clabber Girl site)
- 2 cups all purpose flour
- 1 tablespoon Clabber Girl Baking Powder
- 2 teaspoons sugar
- 1/2 teaspoon cream of tartar
- 1/4 teaspoon salt
- 1/2 cup shortening, margarine, or butter
- 2/3 cup milk
- Instructions:
In a medium mixing bowl, stir together flour, Clabber Girl Baking Powder, sugar, cream of tartar, and salt. Using a pastry blender, cut in shortening till mixture resembles coarse crumbs. Make a well in center; add milk all at once. Using a fork, stir just till moistened.
On a lightly floured surface, knead dough for 10 to 12 strokes or till the dough is nearly smooth.

For this recipe you will want to roll the dough out as thin as you can get it. Then top it with 2 cups of shredded beef and 2 cups of shredded cheese ( I used mexi-style). Leave one end topping free so when you roll it closed you can get a good seal on the end.

Start rolling into a roll ( kind of like Cinnamon rolls)

Use a sharp knife to cut into 1 inch segments.

Place into a greased baking dish. Bake at $450 degrees 12-16 minutes till edges have started to brown and middle is cooked well. Top with brown gravy and enjoy!

Disclaimer: This post may or may not contain affiliate links.
SUBSCRIBE and never miss a thing!