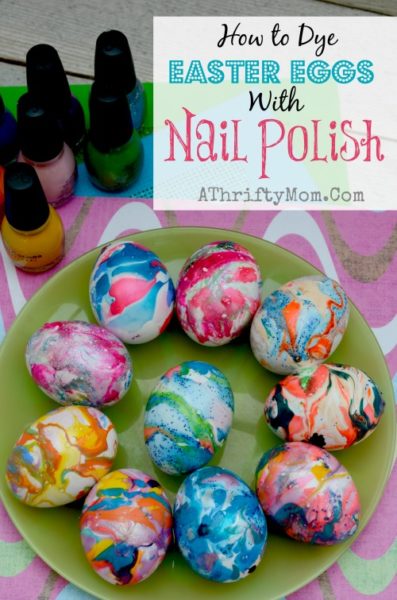
Look What I Made

Last updated by at .

chocolate filled strawberries

A few weeks ago I shared a quick and easy treat, Chocolate Filled Strawberries.  They are quick and easy to make but can get a little tricky if you are making a bunch at a time.  They will fall over and the warm chocolate will run out of them.  But I have found a quick solution. When you make chocolate filled strawberries, set them in a mini muffin tin. This will keep the chocolate in place till it hardens.

chocolate filled strawberries

Spring

Here are a few suggestions to use strawberries in besides the good ‘ole jam.

Leave a Comment: 0 comments

Filed Under: Dessert, Look What I Made

Tags: , ,

Disclaimer: This post may or may not contain affiliate links.
SUBSCRIBE and never miss a thing!

hutch before and after

Furnishing your home on a budget ~ Furniture upcycle

Furnishing your home can break the bank in no time!  Three years ago me moved from our 900 sq ft starter home (that we lived in for 9 years) to our 2,600 sq ft “fix-r-upper” home.  Needless to say we were going to need to buy a few things to furnish our new larger home. Just one problem, I hate buying furniture

First~  it cost way t0o much.

Second ~ they don’t make things like they use to, and new stuff seems to fall apart way to quick with 4 kids.

Third ~ IF it is brand new I feel like a I need to wrap the darn thing in yellow caution tape and keep my kids from it, terrified it might get a scratch.

Fourth ~ Buyers remorse, if I am going to spend that much money I want to make sure it is perfect…. WHAT if I do not like it?

hutch

 So over the years I have bought some new pieces and some “new to me” pieces.  What I have learned  is  I REALLY like to buy used furniture, change it up a bit and make it my own.   If you watch craigslist and yards sales you can find some killer deals! Or even better think outside the box and repurpose pieces I already have in my home.  The white dresser I have in the photo above was a hand me down from my sister in law.  We have used it in my sons room for 11 years.  He has now outgrown it and needed something bigger.hutch1

I did not need another dresser but I need need something to store linens and extra dishes in, in my kitchen.  SO  I decided to take this dresser, give it a new coat of paint and repurpose it as a hutch for my kitchen.  I gave it a light sand, sprayed it with Walnut Brown paint, sanded the edges down to give it a vintage look.  Simple as that, I had a new piece of furniture for my kitchen.

No it is not perfect, but that is what I love about it.  It fits the space great,  it has character, it is sturdy and it was FREE.  All I had to do was pay for a can of paint! And if my kids bump it or scratch it… no harm done!

DSC_7291

Leave a Comment: 2 comments

Filed Under: DIY, Look What I Made

Tags: , ,

Disclaimer: This post may or may not contain affiliate links.
SUBSCRIBE and never miss a thing!

Thanks to  Tales of Domestica for this money saving  idea for using  old crayons to make new crayons.  I have never tried this before but have always wanted too… I know my kids would love it!

If you would like to be a featured guest post on Look What I Made,watch for our weekly post each Tuesday called A Thrifty online craft fair, link up and you may be selected for our weekly feature post.

First step to make new crayons,  you will need to take the paper off your old broken crayons.  Then sort your crayons into like colors.  The kids like it, plus it is great for them to learn to sort and group items together.

Next add like colors into a tin can, or an old pot.  If you use a tin can put it into another pot with water around it to make a double boiler of sorts. Over low heat melt your crayons.

 Once your crayons are melted pour them into the  silicone ice cube trays. Allow to cool then pop from the molds.  Then let your little ones color and have fun with their new crayons.  Who knew it was so simple to make your own crayons.

More ideas, projects and fun things to do with your kids this summer.

 Dirt and Worms ~ Fun summer recipe for kids


Leave a Comment: 3 comments

Filed Under: Ideas for Entertaining kids, Look What I Made

Tags: , , ,

Disclaimer: This post may or may not contain affiliate links.
SUBSCRIBE and never miss a thing!

How to Stain Concrete Floorsatmgraphiclook

Thanks to Emily for passing along this thrifty tip on how to stain your concrete floors. Oh my word… I totally feel in love with this idea, and it looks amazing! If you would like to be a featured guest post on Look What I Made , watch for our weekly post each Tuesday called A Thrifty online craft fair, link up and you may be selected for our weekly feature post.

Earlier this year we adopted a dog from our local rescue group. This dog was not house trained and in our efforts to “convert” him he chewed a massive hole in our living room carpet all the way through the padding. We didn’t want to replace this with more carpet and didn’t want the expense of tile or wood floors. We looked at so many options and then ran across information on stained concrete floors. We completed the process which I will show you below and it turned out amazingly well. It would have cost us over $3000 for new carpet and more than that for tile or wood floors and we purchased the items needed to stain the concrete ourselves and instead got the job done for less than $600 and have ended up with a much better outcome in my opinion. No more renting carpet cleaner or freaking out when something is spilled, I just wipe it up and move on!

Here are some visuals of different points in our project. The first step is to remove the existing carpet and padding and then thoroughly clean the floors.

So here we are with bare concrete floors after removing the tack strips and yes that is my huge black dog enjoying the cool concrete. The most amusing factor of the whole project was watching my husband try to use a buffer.

As you can see the tape we laid the lines down to make this look like tile/marble and we did not want to actually cut grout lines into our concrete as we didn’t want our house filled with concrete dust. Always follow the directions on your stain, not following directions caused us to have to do the staining process twice. Here is the result after the second round.

We were finally satisfied with the color so we removed the tape, sealed and waxed the floors after they had completely dried, and there we have the end result. I used a stencil and gold paint to accent the border. In all it took 5 days and it’s pretty maintenance free from there. I do have to re-seal and wax mine occasionally because of my dogs.

UPDATE : Here are answers to the questions your readers had! I’m so glad people are liking the idea.

* The entire process takes 4-5 days depending on how dirty your concrete is. The concrete must be completely cleaned including renting a buffer with a “scratch” pad to get all of the dirt and grime up. It took us 2 days to get the floor clean and the kit that we purchased did come with a special cleaner to help loosen any stains that may be on the concrete. Cleaning is your most important step, if you leave stains they WILL show through. If you have previously had carpet you will need to remove the tac strips which will likely leave holes in your concrete, these must be filled and sanded down. We created an 8 inch border around the entire room and used a vinyl concrete to resurface the border due to the large holes the tac strips left behind.

* We purchased our staining kit from Acidcrete.com, we purchased 2 colors of stain to get the marbled effect and Acidcrete.com has a number of color choices to choose from. Make sure you follow the instructions and use the “Concrete Prep” solution to open the pores of your concrete or you risk the stain acting as a paint instead of actually penetrating the concrete.

* You do have the option of scoring or cutting your concrete and this can be done using a worm drive saw. We chose not to do this because we have kids and pets and I didn’t want to be constantly cleaning dirt out of the grout lines. We made a very intricate border and used 1/4 inch Quilters tape. The tape acts as your grout line, you lay the tape after cleaning your floors. You stain the floors to your desired color, seal the floors and when those steps are complete you remove the tape from the floors leaving you a nice gray grout line. You can purchase the quilters tape at Hancock fabrics and make sure you use the white, the neon colors didn’t stick very well.

* I have not experienced the floors being extremely cold like I expected, they are not nearly as cold as my tile floors. Right now my living room is the only room with stained concrete but we plan to continue it throughout the entire downstairs.

Below is a better picture of the border and tape used to create the grout lines and also the gold stenciling within the border.  Also Youtube has multiple videos on how to stain concrete floors.

Click Here for large image of below

Leave a Comment: 6 comments

Filed Under: DIY, Look What I Made

Tags: , , ,

Disclaimer: This post may or may not contain affiliate links.
SUBSCRIBE and never miss a thing!

DIY Bird feeder

DIY Bird Feeder by Tiffany – When I was little and in school we made these easy DIY bird feeders. I thought my kiddos ages 3 and 6 were old enough to make them, so we gave it a go. They did a fantastic job and had so much fun making them. After we hung our bird feeders, we sat patiently and watched to see if the birdies would come, and they did! My three year old daughter thought this was the best project EVER! She was even nice enough to bring more empty rolls of toilet paper, wasn’t that sweet?! Yes, she unrolled several rolls before I knew what she was doing. Little stinker! :)

Easy DIY Bird feeder

Supplies Needed:

  • Bird Seed
  • Creamy Peanut Butter (challenge yourself with the crunchy :) ..)
  • Empty Toilet Paper Rolls
  • String, Ribbon or Twine
  • Scissors, for cutting ribbon
How to make a peanut butter bird feeder
1. Put the ribbon through the toilet paper tube and make a knot at the top. (This can be done before or after rolling in peanut butter & bird seed. We’ve done it both ways.)
DIY peanu butter bird feeder
2. Spread peanut butter all over toilet paper tube.How to make a bird feeder

3. Roll peanut butter covered tube in bird seed.
4. Hang in your favorite tree & watch the birdies come. :)

How to make a bird feeder

Thanks Tiffany – hope your lil cutie pie has fun hanging those!

Leave a Comment: 1 comment

Filed Under: DIY, Look What I Made, Thrifty Craft Ideas, Thrifty Kids

Tags: , ,

Disclaimer: This post may or may not contain affiliate links.
SUBSCRIBE and never miss a thing!

Recipe and Photo Credit McCormick

Irish Cream Swirl Brownies
Prep Time: 20 minutes
Cook Time: 35 minutes

  • 1 package (18 to 20 ounces) fudge brownie mix
  • 1 teaspoon McCormick Pure Vanilla Extract
  • 1 package (8 ounces) cream cheese, softened
  • 1/4 cup sugar
  • 2 tablespoons flour
  • 1/4 cup Irish cream liqueur
  • 1 egg
  • 1/4 teaspoon McCormick Green Food Color

1. Prepare brownie mix as directed on package, adding vanilla. Reserve 1 cup batter. Spread
remaining batter in greased 9-inch square baking pan.
2. Beat cream cheese, flour and sugar in medium bowl with electric mixer on medium speed
until smooth. Add Irish cream liqueur, egg and food color; beat until well blended. Pour over
brownie layer in pan. Drop reserved 1 cup batter by spoonfuls over cream cheese layer. Cut
through batter with knife several times for marble effect.
3. Bake as directed on package for 9-inch square baking pan. Cool in pan on wire rack. Cut into
squares. Serve with a small scoop of vanilla ice cream, if desired.
Makes 16 servings.
Test Kitchen Tips:
For easy clean-up, line pan with foil with ends of foil extending over sides of pan. Use foil
handles to remove brownie from pan. Place on cutting board and cut into squares.
If desired, 1 teaspoon McCormick Pure Vanilla Extract may be used in place of the Irish
cream liqueur. Omit flour.

Leave a Comment: 0 comments

Filed Under: Look What I Made

Tags:

Disclaimer: This post may or may not contain affiliate links.
SUBSCRIBE and never miss a thing!